A lot of people believe there is nothing that cannot be done with Excel. Many small companies that cannot afford an ERP system use Excel to manage their purchase orders and PO receipts. They also use Excel to reconcile their accounts. The seemingly “zero-cost” purchasing management process, however, often turns out to be more time-consuming and costly due to scattered data and the difficulty of comparison. See if any of the following situations sound familiar:
For example, a new purchase record is added to the Excel-based purchase order sheet after the owner gives instructions to issue a purchase order. However, since Excel itself does not provide an approval feature, the purchase order has to be sent to and confirmed by the owner via email before it can be printed and faxed to the vendor. The signed and returned paper copy of the purchase order is then placed in a folder, effectively reverting the process to manual handling. Purchase orders are sorted manually as needed, and invoice deadlines are tracked by memory. The broken information flow makes it difficult to track purchase orders systematically through receipt and incoming quality control.
As another example, Excel files are used to record receipts. One new file is created each month, and one sheet for each vendor. Monthly vendor statements are checked against information in the PO receipts. The process looks easy, but in fact ends up having data scattered all over the place. In other cases, purchase orders and receipt records, while containing related data, are not connected and have to be checked by eye. One missing receipt or entry may lead to chaos. Identifying a data error may take more time than entering the data.
Our PSI template is comprised of three separate templates: Sales Order Management, Purchasing, and Inventory Management. If you only need the functions of one of these, it can be installed separately as well.
If you don’t have a Ragic account, click here to sign up and install the "Purchasing Management" template, or click here to install the full "PSI" template set. This entire process is free, and we will not charge you without your consent.
If you are already a Ragic user, you can find the "PSI" template under the "Template Suites" category in Install Templates and click "Install" to download it.
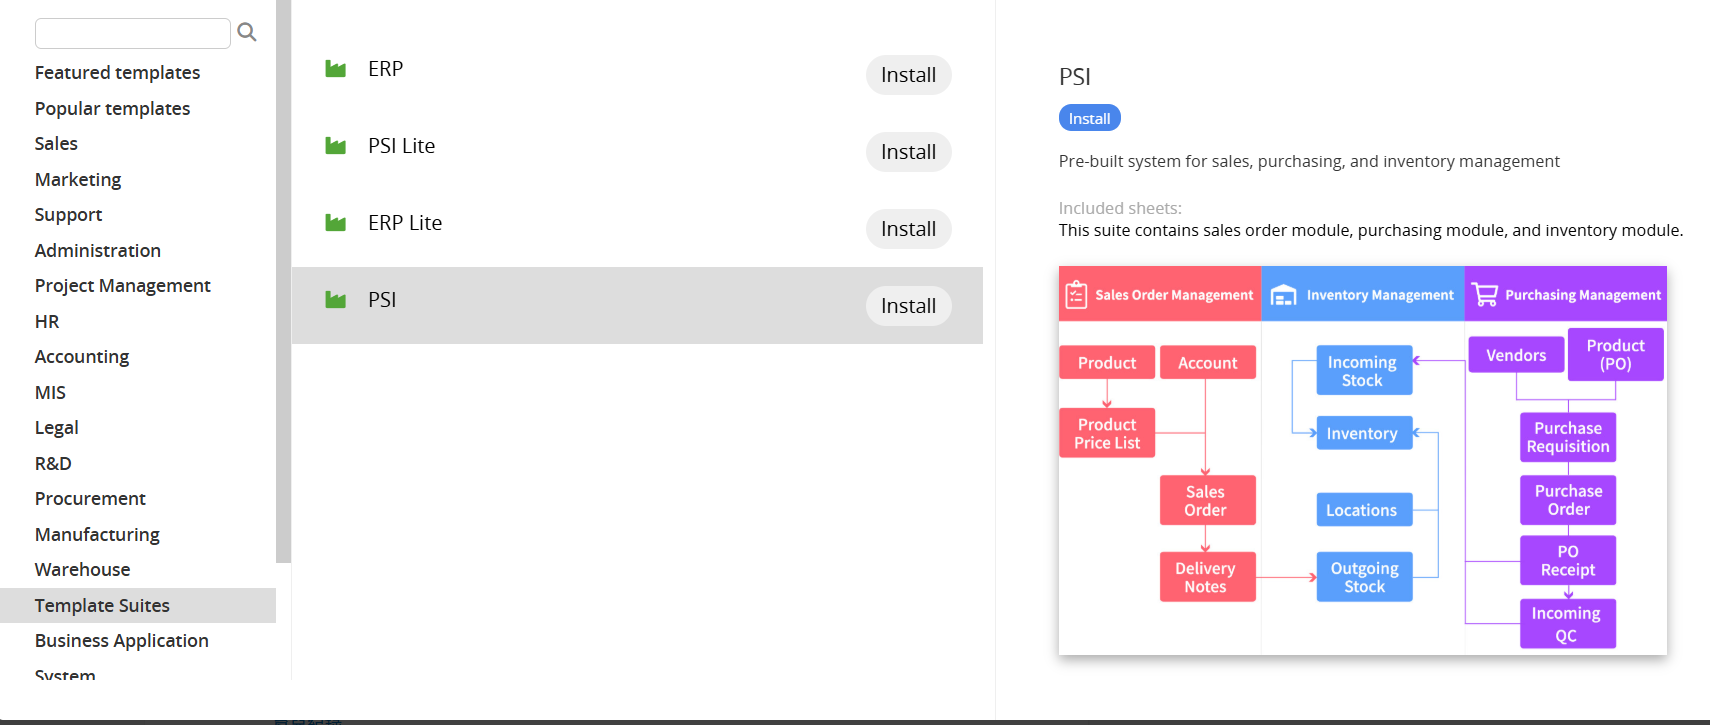
Please see the details below for the usage process of the Purchasing Management template.
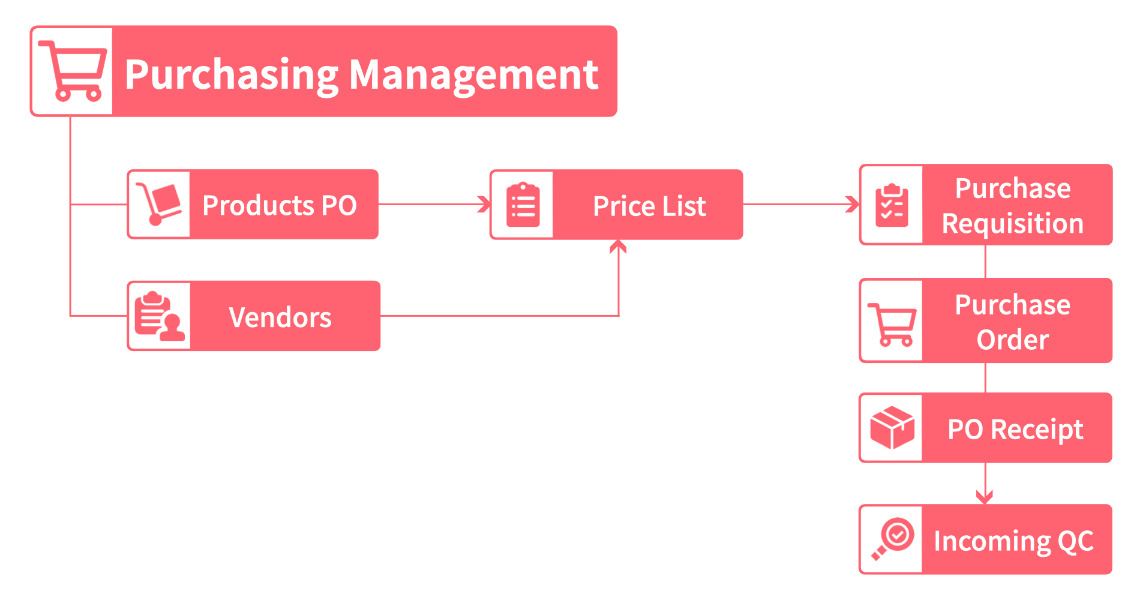
The Purchasing Management template is designed to manage vendor information, purchasing price, and the entire purchasing process. The purchasing process includes a purchase requisition completed by staff (and approval), a purchase order used by the procurement staff, and subsequent receipt and incoming quality control.
This template consists of 8 sheets, of which the "Purchase Items" sheet is read-only, used only to establish sheet relationships. No data entry is required in this sheet.
Please refer to the flowchart below for the corresponding data input workflow.
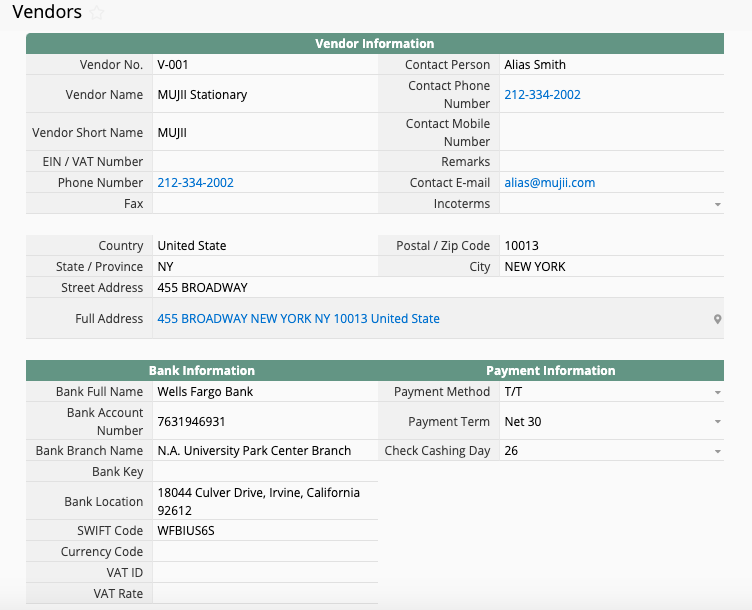
The "Vendor" sheet keeps complete details on individual vendors. In subsequent procedures, the "Vendor No." will be selected from this sheet when a "Purchase Order" is created.
Vendor No.: A serial number automatically generated by the system, starting with V. If you prefer to use your own vendor number, you can modify this field after saving the record.
Vendor Name and EIN / VAT Number do not allow duplicate values, and are the Unique Values in this sheet.
The products in the "Purchasing Management" template are divided into two levels. One level is the "Products", which revolves around the products; the other is the "Product Purchasing Price List", which revolves around the prices of the products. (For example, a product may be quoted by three vendors; so there will be one record for the product information and three records for the Product Purchasing Price Lists)
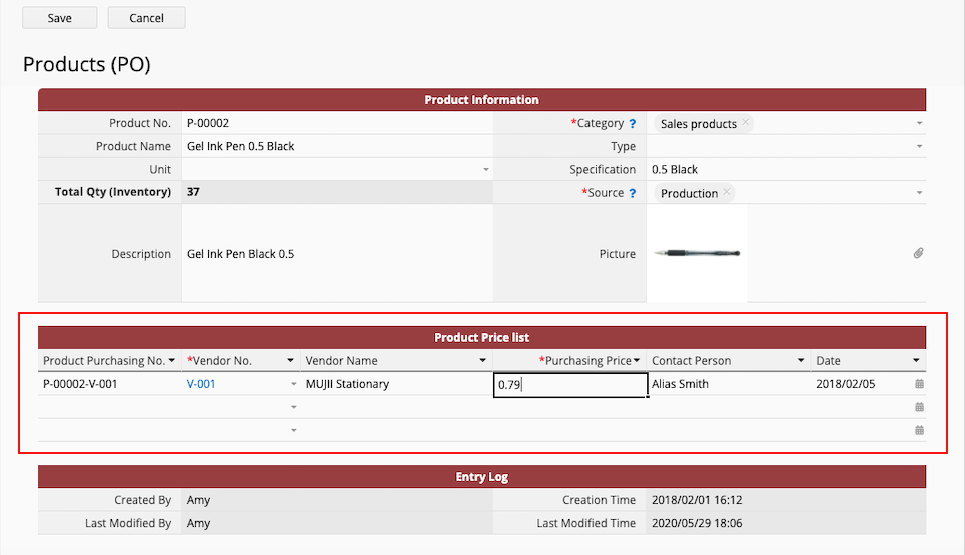
The Products (PO) sheet, the Inventory Management template’s "Inventory" sheet, and the Sales Order Management template’s Products (SO) sheet are Multiple Versions; they share the same data source. In other words, when you add a new item to the "Products (PO)" sheet, the item will also appear in the "Inventory" and "Products (SO)" sheets. The difference is that the "Products (SO)" sheet only displays records with the Category set to "Sales Product", while the "Product Pricelist" subtable in the "Products (PO)" sheet is used to record the purchasing prices of the product from different vendors.
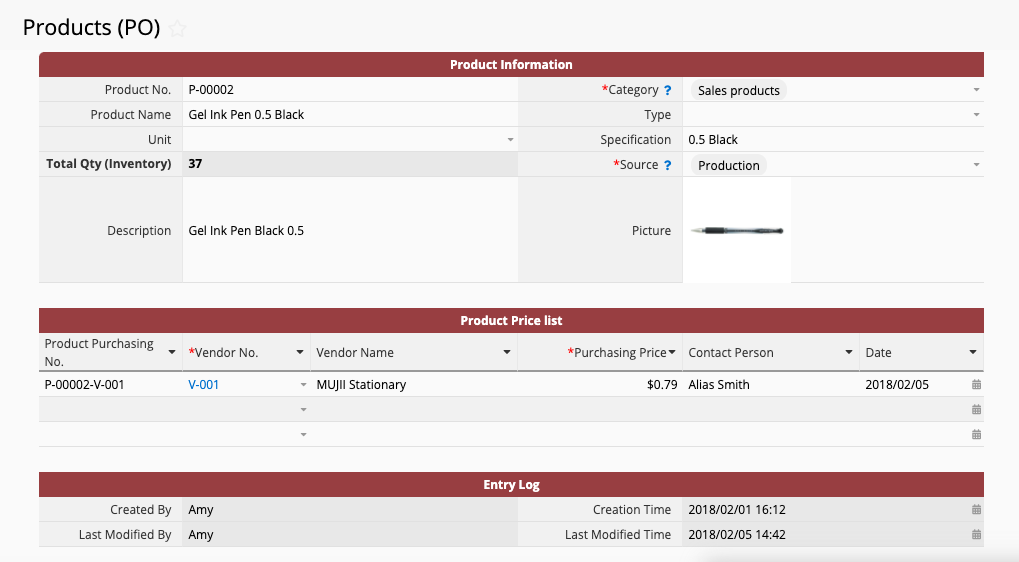
In the "Product Price List" Subtable:
Product Purchasing No.: Automatically generated by formula. The format will be Product No.-Vendor No..
Vendor No.: When selected, the Vendor Name and Contact Person will be automatically loaded.
Purchasing Price: Make sure to enter the corresponding price for the product and vendor.
Date: By default, this is the date on which the record is created.
This is used to record a product and the purchasing price offered by a vendor. Product Purchasing No. is Product No.-Vendor No. and a Unique Value in this sheet.
This sheet is generated from a Subtable in the "Products (PO)" sheet and is therefore linked to the "Product Price List" Subtable in the "Products (PO)" sheet. Each record in the "Product Price List" Subtable in the "Products (PO)" sheet corresponds to one record in this sheet.
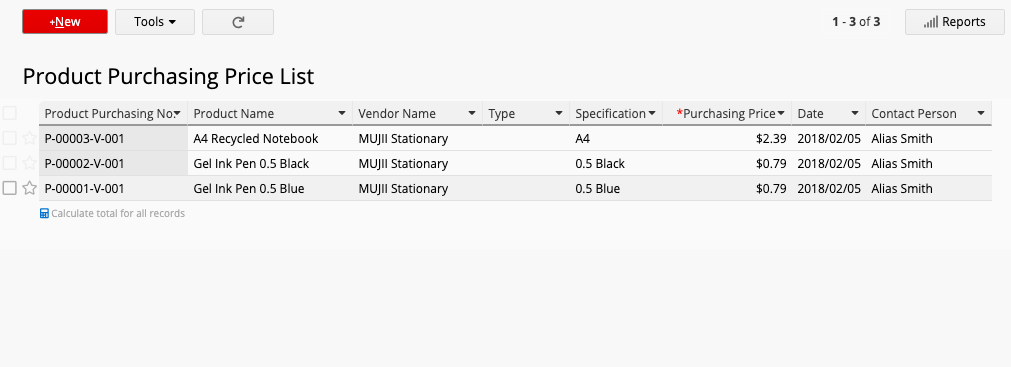
Apart from the "Product Price List" Subtable in the "Products (PO)" sheet, new records can be created directly in this sheet.
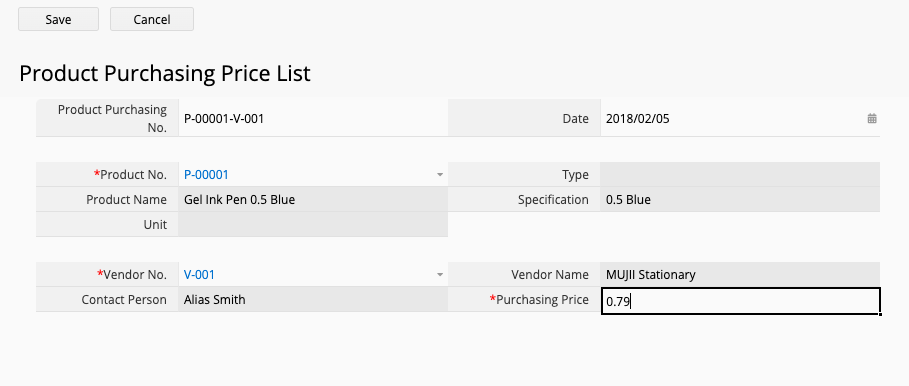
Product No.: Linked to the "Products (PO)" sheet. Once selected, the Product Name, Type, and Specification will be automatically loaded.
Vendor No.: Linked to the "Vendors" sheet. Once selected, the Vendor Name and Contact Person will be automatically loaded.
Product Purchasing No.: Assigned by formula, and its value is generated as Product No.-Vendor No..
Date: By default, this is the date on which the record is created.
Purchasing Price: Make sure to enter the corresponding price for the product and vendor.
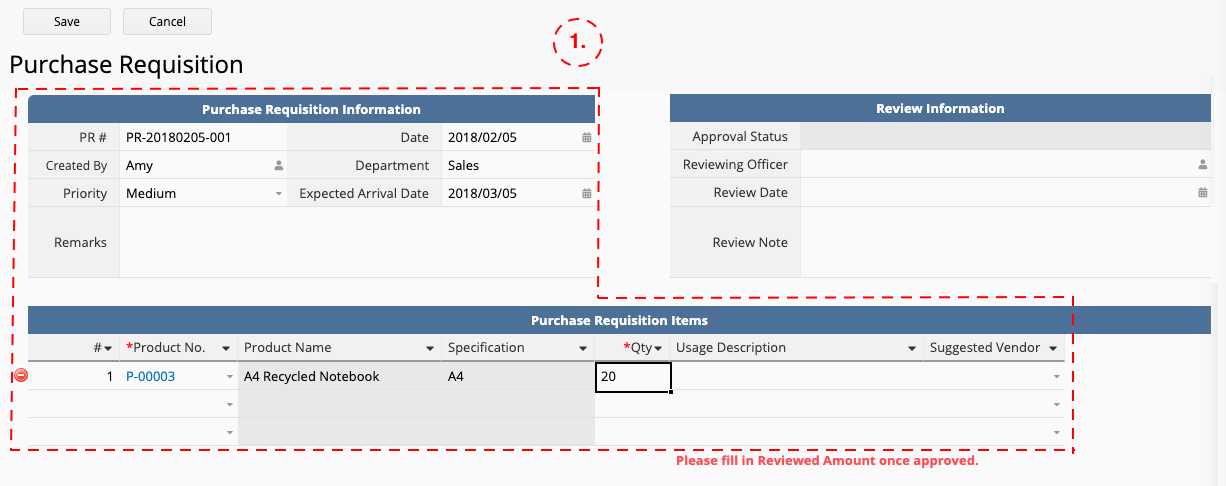
Purchase Requisition is to be completed by the user to list purchasing requirements (including sales, raw materials, finished goods, semi-finished goods, and packaging materials) for a product.
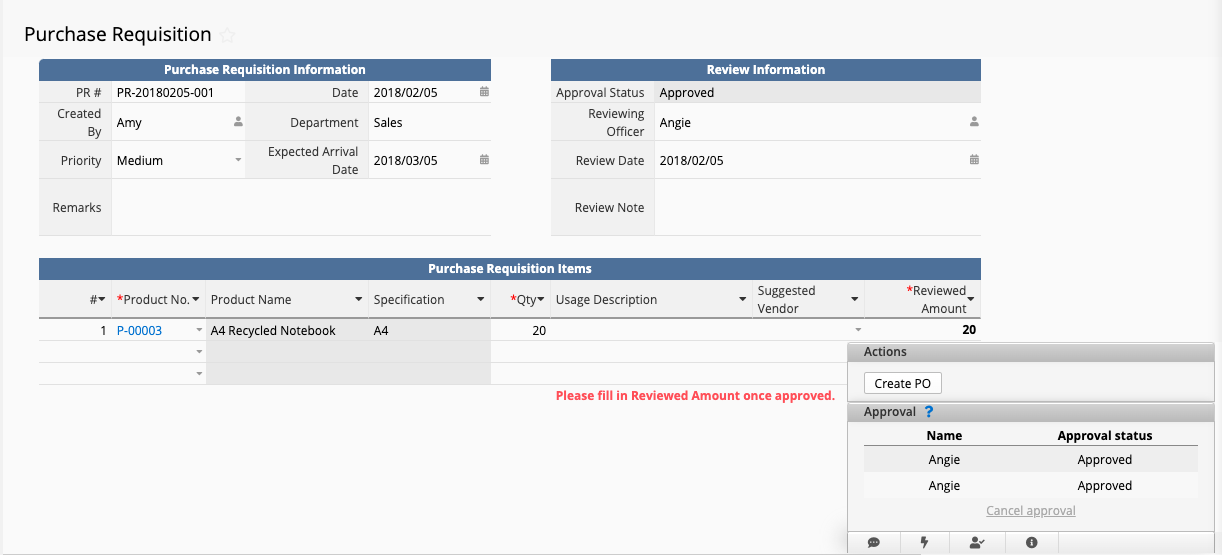
This sheet consists of two parts:
1. The first part is completed by the user submitting the purchase requisition. After clicking the "New+" button, the user needs to confirm the following fields:
PR #: A serial number automatically generated by the system, starting with PR.
Date: By default, this is the date on which the record is created.
Created By: Defaulted to the current user.
Department: Determined by the Created By field and automatically loaded from the user information in the system.
Priority: By default, set to Regular, and is a Selection field.
The "Purchase Requisition Items" Subtable below allows multiple products to be added. Select Product No. to have Product Name and Specification automatically loaded. Fill in Qty and, if necessary, provide the Usage Description and select a Suggested Vendor.
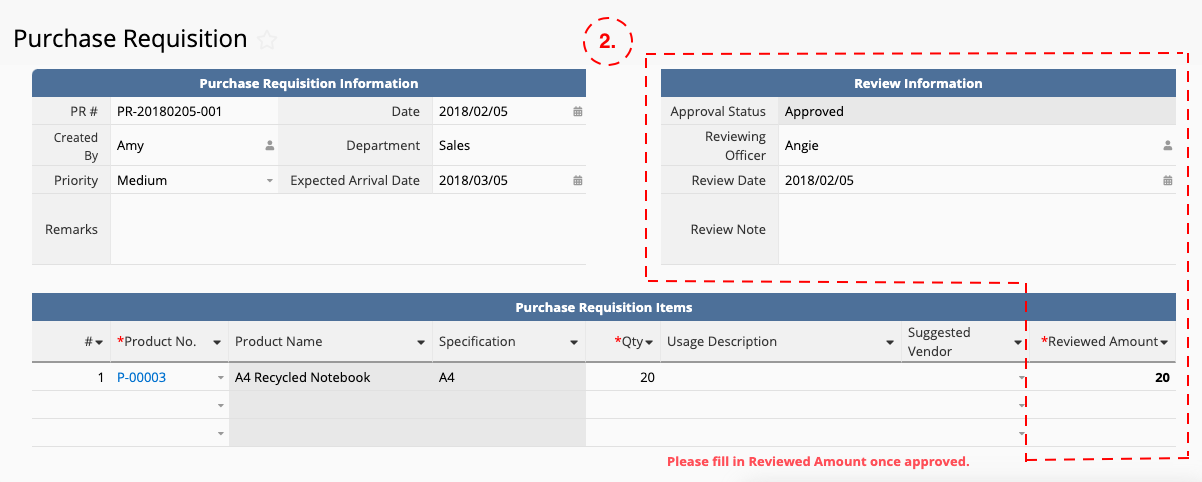
When a record is created, proceed to start the approval flow. The approval flow currently requires the approval of the direct supervisor (to be loaded from the system user sheet) on the first level and that of a user-selected member of the procurement staff on the second level.
2. The second part is completed by the procurement staff to approve the purchase. After the approval process is completed, the following fields must be filled in: Reviewing Officer, Review Date at the top right, and Reviewed Amount in the Subtable below. (The Reviewed Amount field in the Subtable will only be displayed after the approval is completed.)
The "Purchase Order" record can be created by converting from a "Purchase Requisition", or by manually creating an order directly on the "Purchase Order" sheet.
If "Purchase Order" is converted from a "Purchase Requisition", only From PR # and Required Date (two weeks before the Required Date on the original "Purchase Requisition"), as well as Product Name, Specification and Qty will be converted here.
Given that a purchase requisition may contain multiple products that have to be sourced from different vendors, and that each purchase order can only be issued to one vendor, if data are added by converting, Vendor and Promised Date here and Product Purchasing # in the "Purchase items" Subtable, like in a completely new record, will have to be filled in manually.
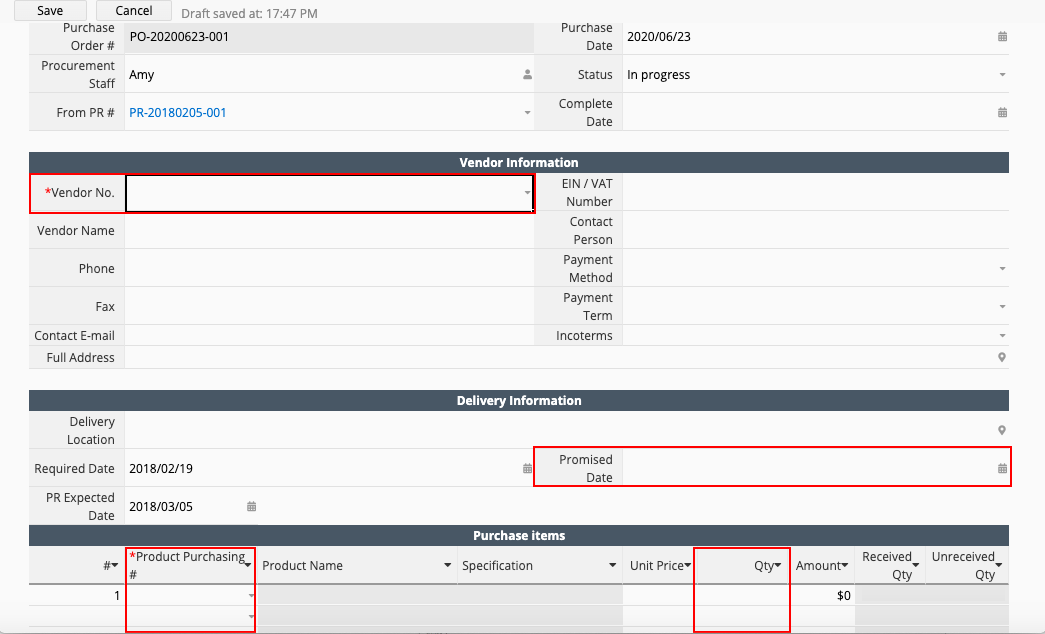
When information in a "Purchase Order" is confirmed, please be sure to initiate the approval flow.
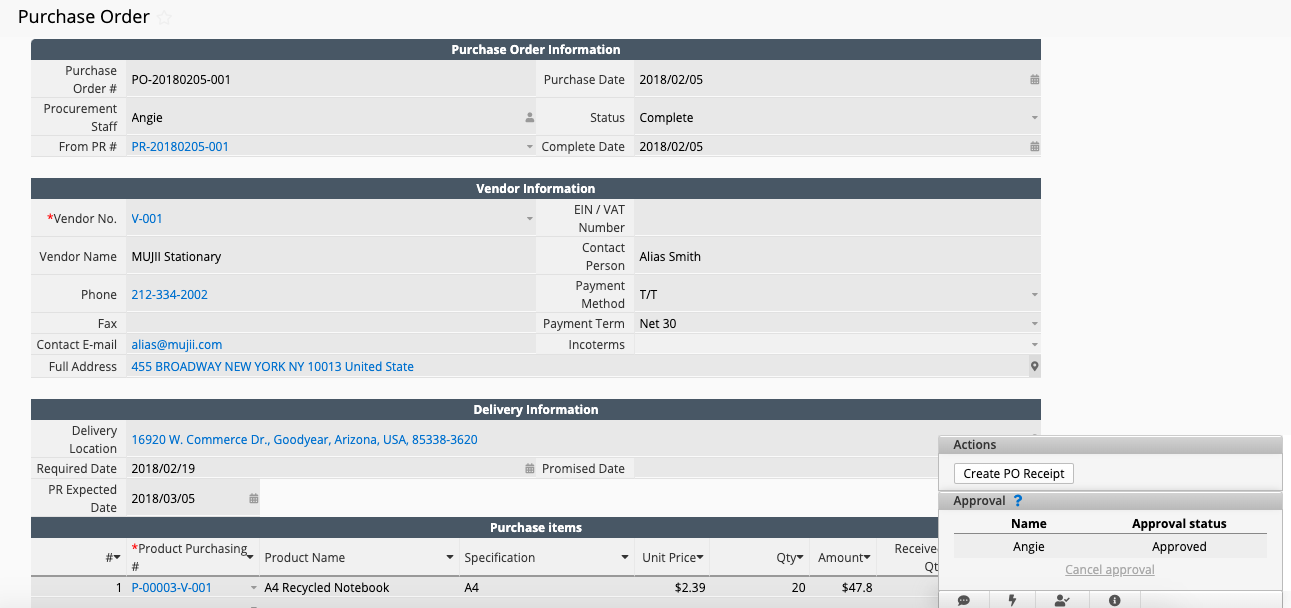
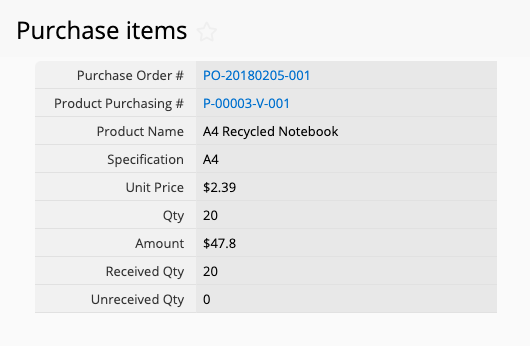
It is used to record all purchase items in each "Purchase Order". This sheet is generated from the "Purchase Items" Subtable in the "Purchase Order" sheet and is therefore linked to the "Purchase items" Subtable in the "Purchase Order" sheet. Each record in the "Purchase items" Subtable in the "Purchase Order" sheet corresponds to one record in this sheet.
All fields in this sheet are Read Only as manually creating or updating records should be done directly in the "Purchase Order".
Note: This sheet is vital to the subsequent receipt process. Do not delete.
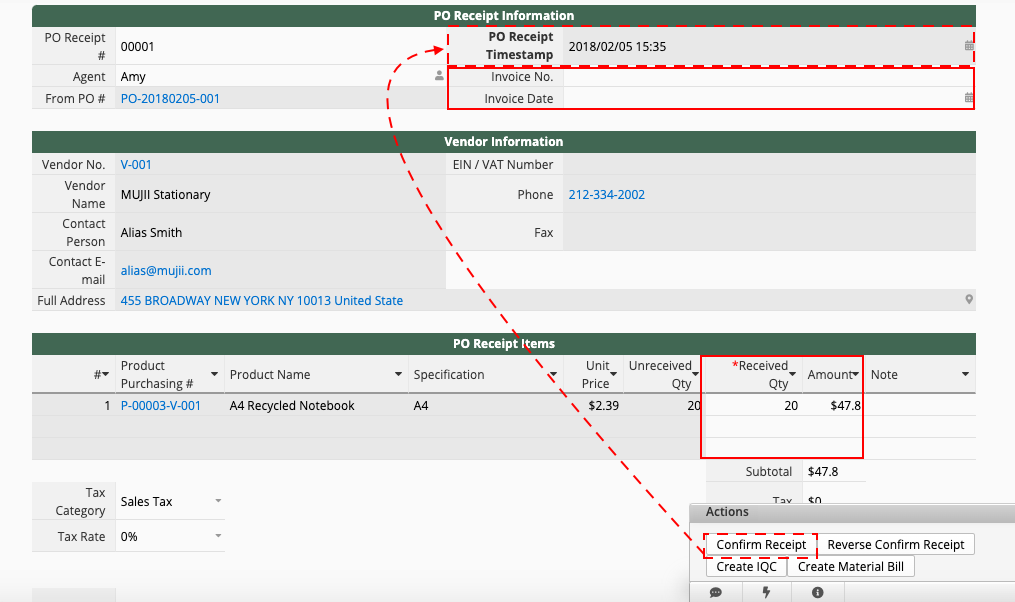
The "PO Receipt" record has to be created by converting from a "Purchase Order", with relevant information entered manually, such as Invoice No. and Invoice Date as well as Received Qty in the "PO Receipt Items" Subtable. Please be sure to check and confirm if Amount is correct.
When receipt details are confirmed, proceed to click on the Confirm Receipt button. The system will update Received Qty and Unreceived Qty in the "Purchase Items" in the corresponding "Purchase Order", and fill in the PO Receipt Timestamp (date and time when the button is executed) on the "PO Receipt".
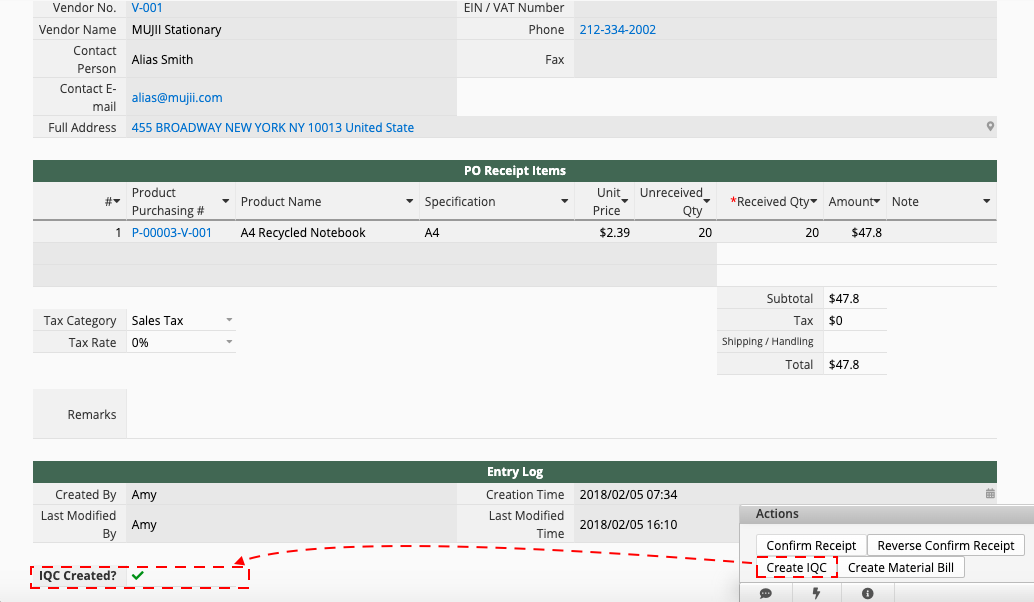
The "Incoming Quality Control" record has to be created by converting from a "PO Receipt".
Clicking the Create IQC button on the "PO Receipt" will generate a new record in the "Incoming Quality Control" sheet, and the system will update the IQC Created? status on the "PO Receipt". Each "PO Receipt" record can be converted into one "Incoming Quality Control" record. Records cannot be converted more than once.
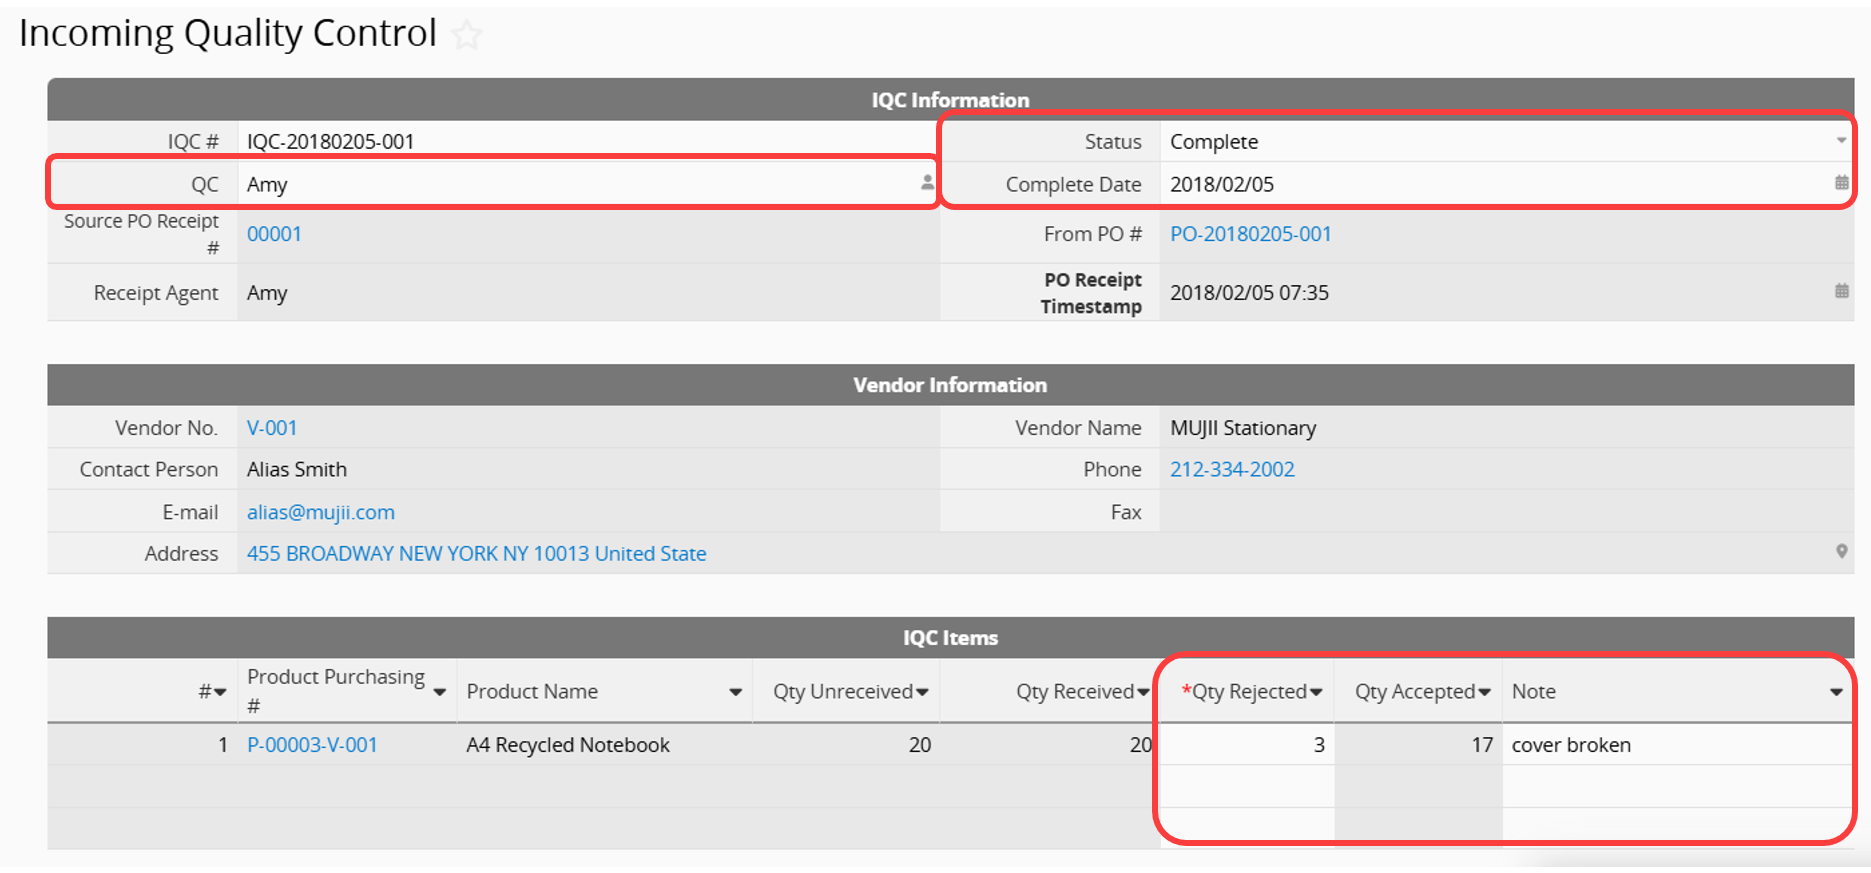
Field descriptions for the "Incoming Quality Control" sheet are as follows:
QC: By default, the same as Created By.
Status and Complete Date: Must be updated or entered manually.
"IQC Items" Subtable: Be sure to fill in the Qty Rejected for each item in the Subtable (and verify that the Qty Accepted is correct). If there is any Qty Rejected, you can enter a Note.
After confirming the IQC data, be sure to start the approval flow. Once the approval flow is completed, you can use the Return Rejected Items or the Create Incoming Stock button.
After executing the Return Rejected Items button, the system will update the Received Qty and Unreceived Qty in the "Purchase Items" Subtable of the related "Purchase Order", and fill in the Return Rejected Items Time (the date and time when the button is executed) on the "Incoming Quality Control" sheet.
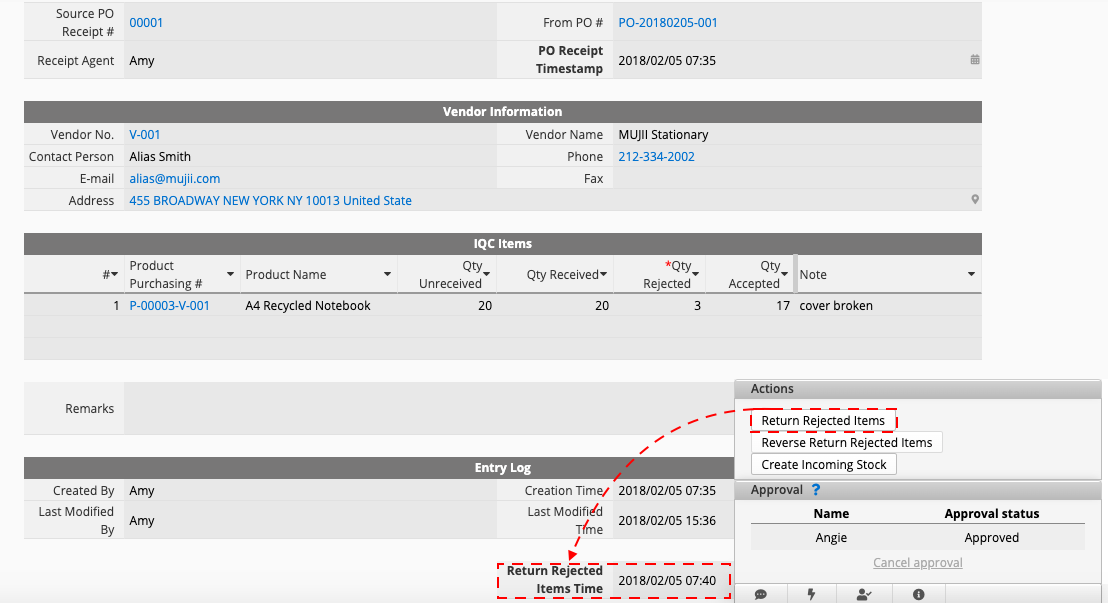
To prevent double execution, the "Incoming Quality Control" entry will be automatically locked after clicking the "Returning Rejected Items" button. To edit or delete the entry, please click the "Reverse Return Rejected Items" button to unlock the entry.
 Thank you for your valuable feedback!
