In Ragic, you can use Mail Merge to export records into customized Excel or Word formats, such as exporting "Sales Orders" into your company's standard format.

Mail Merge can export records in either Form Page or Listing Page format. The available export formats for Excel and Word are as follows:
| Format | Excel | Word |
|---|---|---|
| Form Page Format (Normal Format) | Supported | Supported |
| Form Page Format (Multiple Records per Page) | Unsupported | Supported |
| Listing Page Format | Supported | Unsupported |
Note:
1. While the Excel format does not support the Multiple Records per Page export format, you can achieve a similar result by selecting Save as a single file (containing multiple entries within one tab) when exporting in Form Page format.
2. Mail Merge supports exporting up to 5,000 Subtable records.
The following sections will explain the settings and examples for each format.
Before starting the Mail Merge, you need to create a "Sample Template" (referred to as a "template" below). Click Mail Merge under Tools on the Listing Page or Form Page.
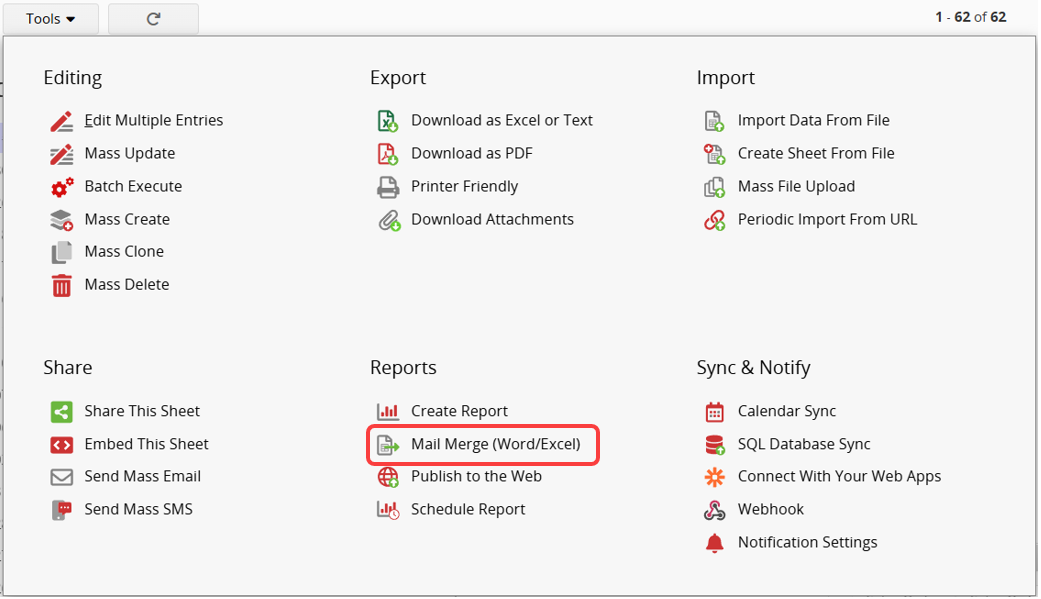
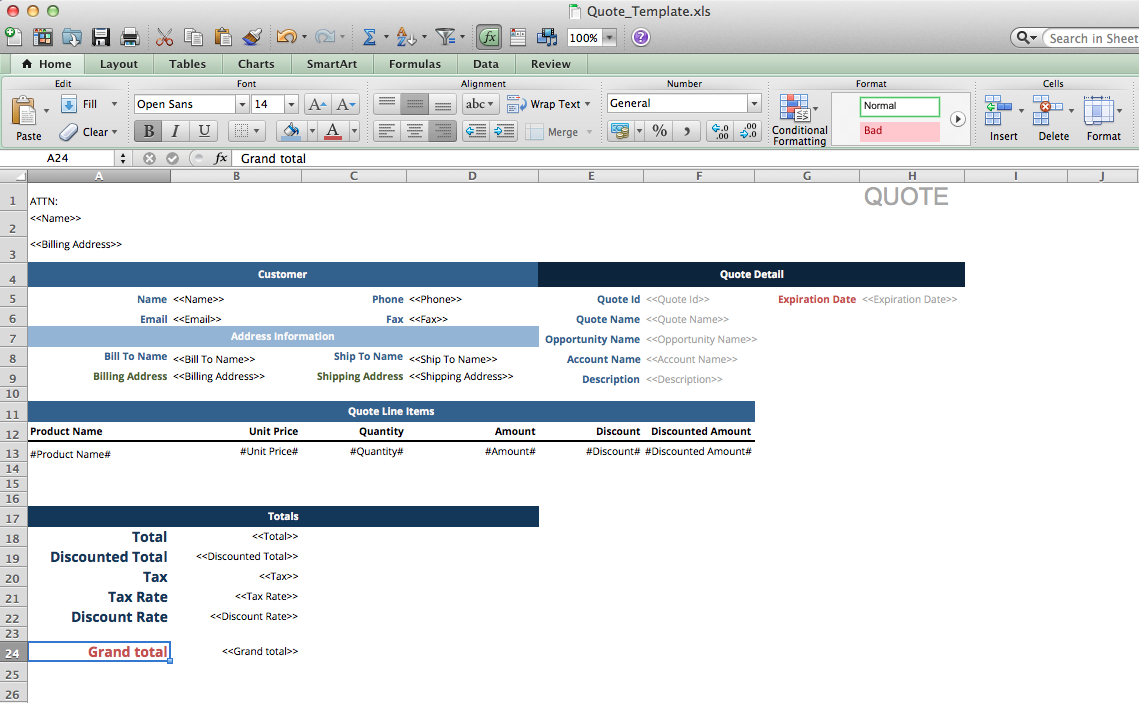
You can download a "Sample Template" to create a template. Click the Download button next to "Sample Template" to get the Excel template for the Form Page. Word doesn't provide a Sample Template, so you'll need to create it manually.

After downloading, you can modify the template as needed, such as adjusting or deleting fields or adding your company name and images. Note that the template design will vary depending on the export format.
Note:
1. In the following examples, Microsoft Excel is used to edit the template, but any spreadsheet application that can save in .xlsx format will also work.
2. Word Mail Merge does not support multiple image settings for Image Upload fields. Unlike Excel, Word lacks clear cell divisions, so there is no suitable output logic for arranging multiple images in the field.
The following explains the parameters that can be used in the template:
The available parameters for Mail Merge and their corresponding output results are as follows.
| Parameter | Output |
|---|---|
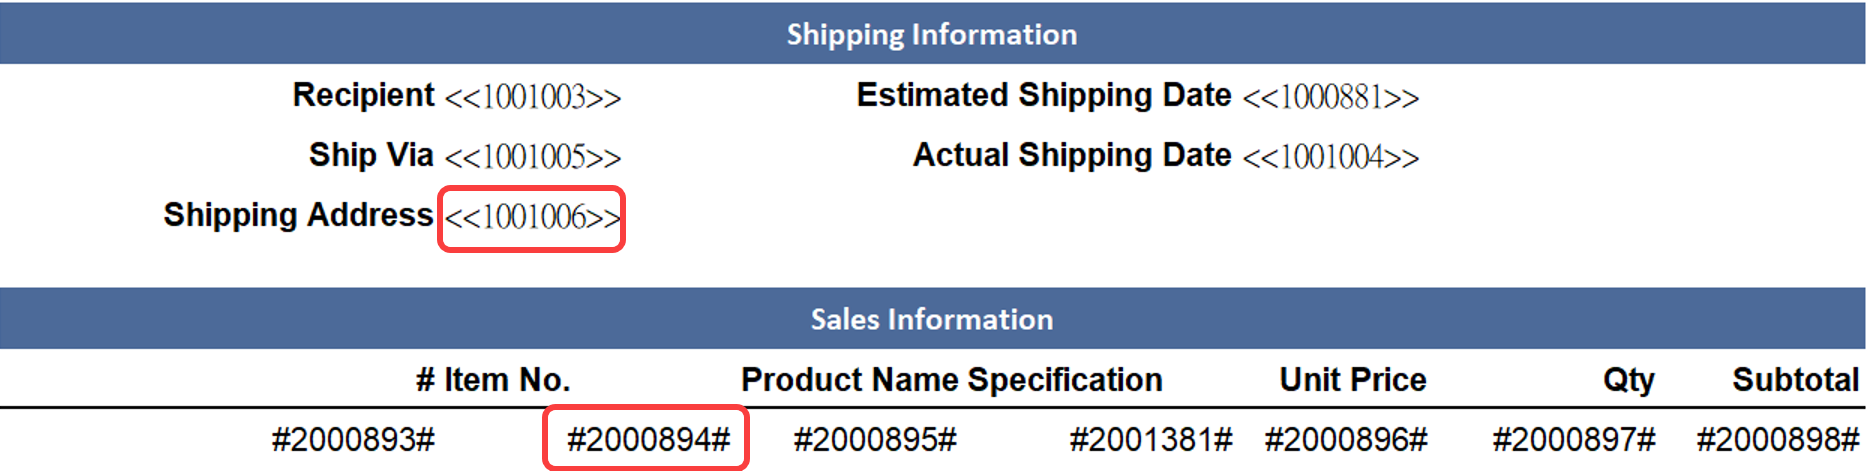
| <<Field ID>> | The value of a field. |
| <<Field Name>> | The value of a field. Case sensitive. If there is more than one field with the same field name, use <<FIELD ID>> instead. |
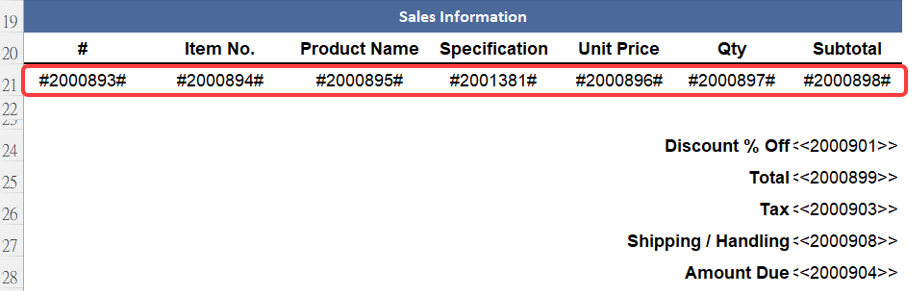
| #Field ID# | The value of a Subtable field |
| #Field Name# | The value of a Subtable field. If there is more than one Subtable field with the same field name, use #Field ID# instead. |
| <<$USERNAME>> | Download User Name |
| <<$USERID>> | Download User E-mail |
| <<$DATE>> | Download Date |
| <<$DATETIME>> | Download Date and Time |
| <<RECORD_LINK>> | The URL of the record |
For example, to add a field, use <<Field Name>>. For a Subtable field, use #Field Name#.
If this sheet is configured with an approval process, the approval records displayed in the bottom right will not automatically appear in the sample template.
To include approval records, manually add the Approval Process Parameters to the template. Most parameters are supported only for output in Excel format.
The following are the parameters related to the approval process and their corresponding output results:
| Parameter | Output | Note |
|---|---|---|
| #{{APPROVAL_STATUS}}# | Approval Status | If an assigned deputy helps approve or reject approval requests, (Deputy) will be shown next to the approval status |
| #{{APPROVAL_APPROVER_TITLE}}# | Step Name | — |
| #{{APPROVAL_DATE}}# | Approval Date | Only shown when the approval step was approved |
| #{{APPROVAL_APPROVER_NAME}}# | Approver’s Name | — |
| #{{APPROVAL_APPROVER_SIG}}# | Approver's Signature in Personal Settings | — |
| #{{APPROVAL_APPROVER_EMAIL}}# | Approver’s E-mail | — |
| #{{APPROVAL_COMMENT}}# | Approver’s Reason | — |
| <<APPROVAL_RESULT>> | Approval's Result | Support exporting to Word |
Example:
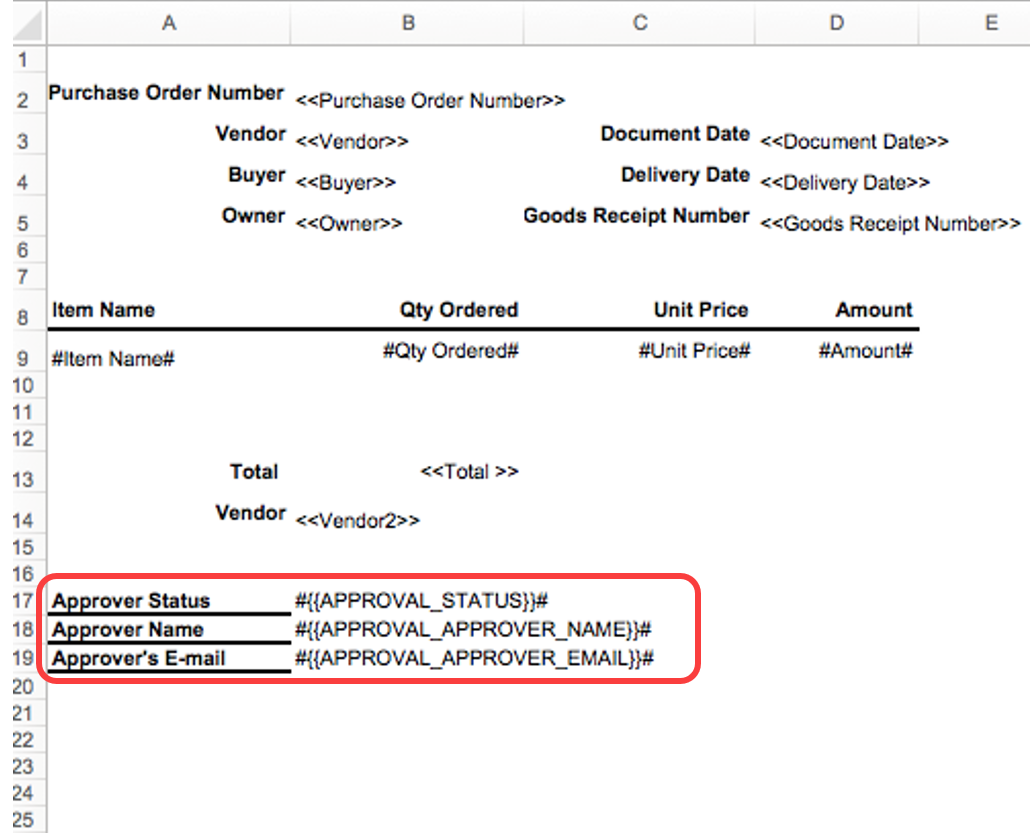
If you want to include the approval records from a "Purchase Order" in the Mail Merge, the original sheet design is as follows:
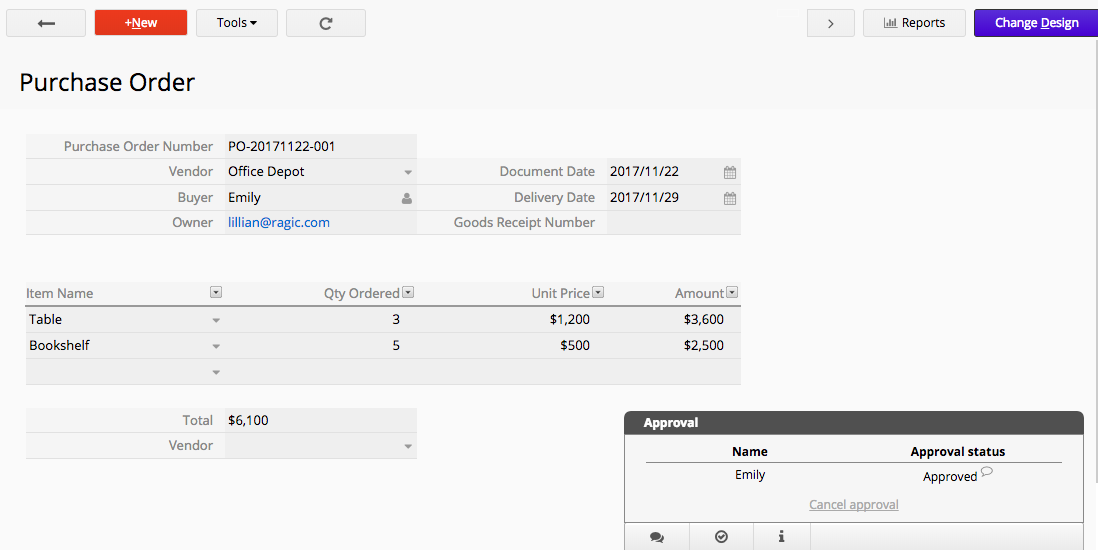
Add the approval process parameters to the template. The example below includes the Approval Status, the Approver’s Name, and the Approver’s Email Address.
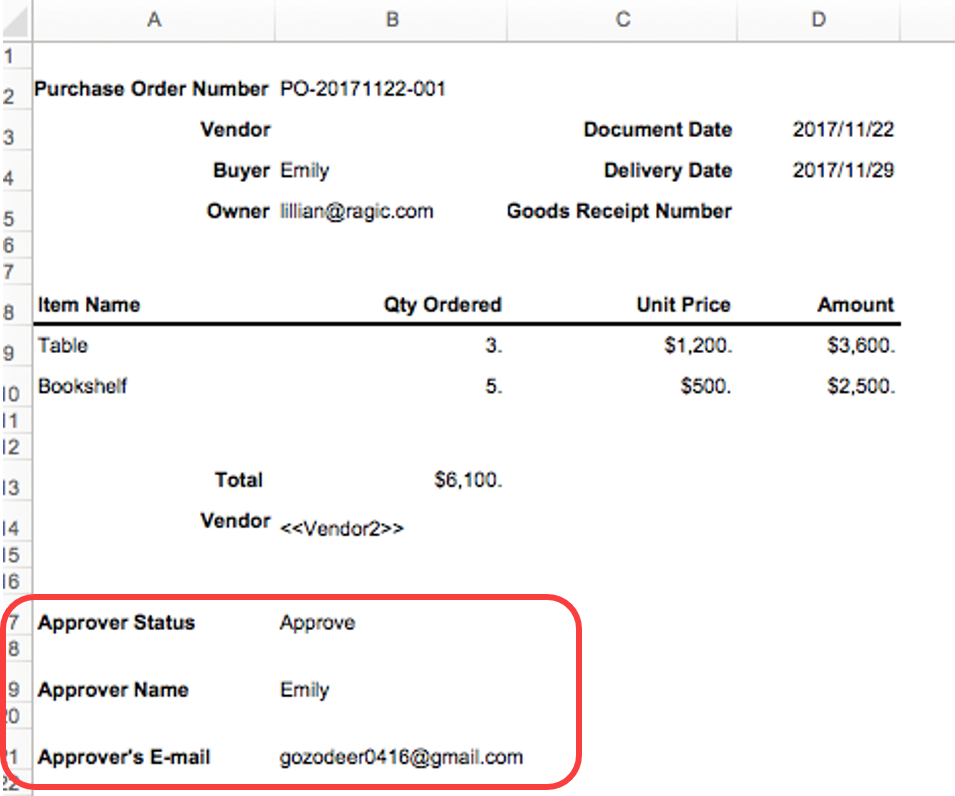
After exporting, the approval records will appear in the fields set within the template.
If you want to export records in Form Page format, you can use either Excel or Word format.
Excel: You can directly download the Excel sample template for modification.
Word: Since Word doesn't offer a downloadable template, you can copy the parameters from the Excel template into Word and adjust your template according to the Parameters List.
Subtables
When exporting Subtables from the Form Page, please note that Word does not support this, so use the Excel format instead. If you want to output Subtable content in a custom Word format, please use the Custom Print Report.
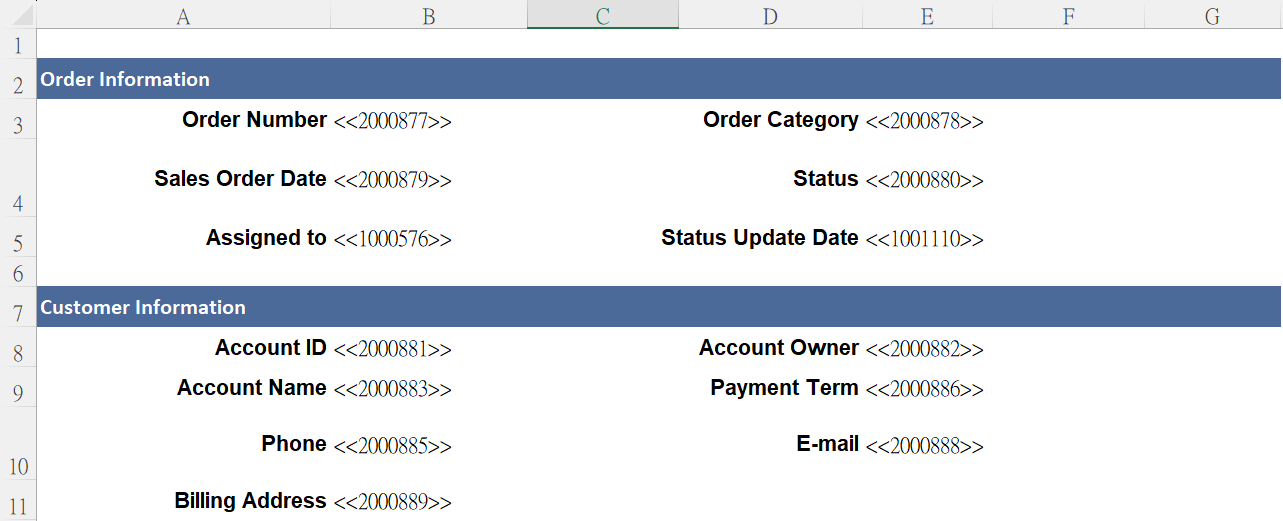
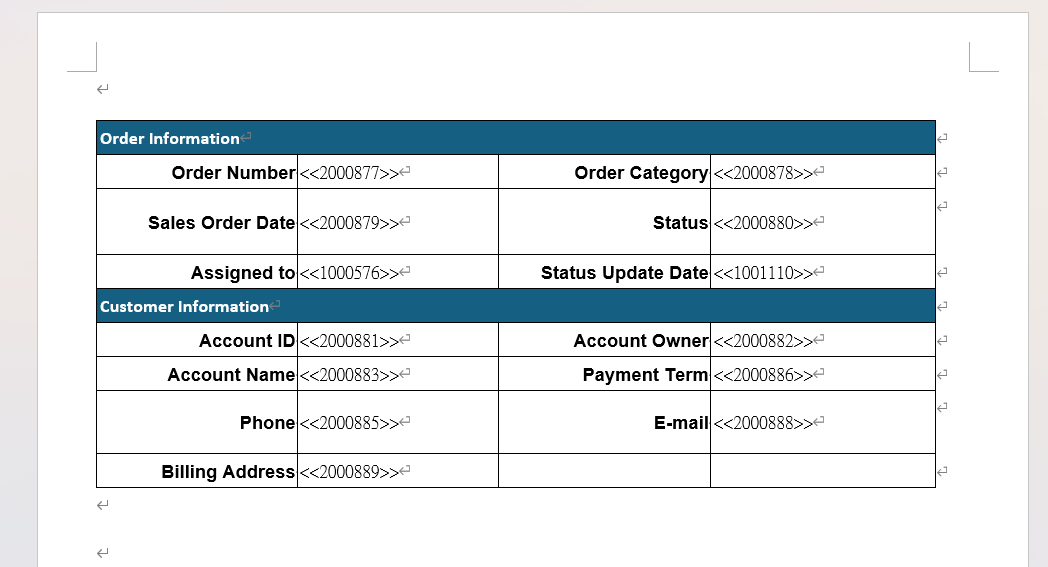
The parameters for Subtables differ from those for independent fields. Please refer to the following examples and Parameter List:
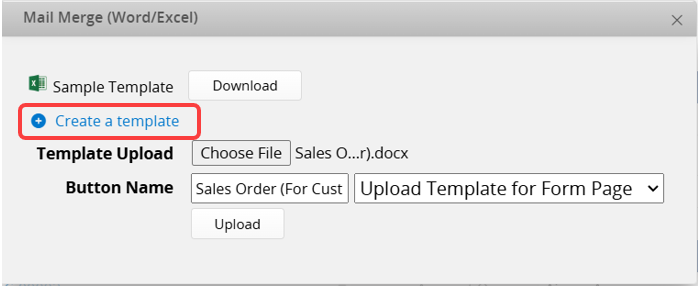
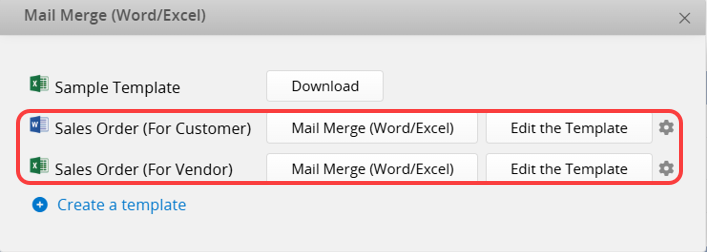
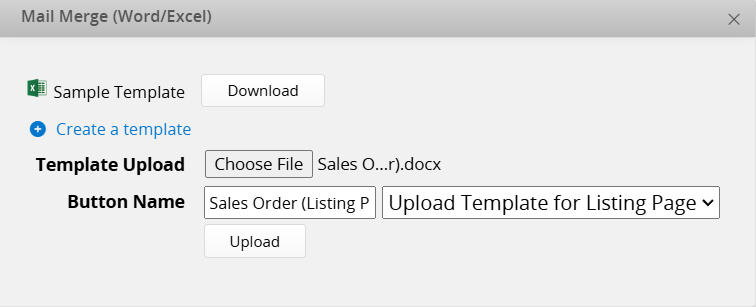
You can upload a Form Page format template on both the Listing and Form Pages. After opening the Mail Merge settings window, click Create a Template, select the file under Template Upload, name the Mail Merge template, choose Upload Template for Form Page, and click Upload.
You can upload different versions and formats of the template according to your needs.
You can export records in Form Page format from both the Listing Page and the Form Page.
1. Exporting a Single Record
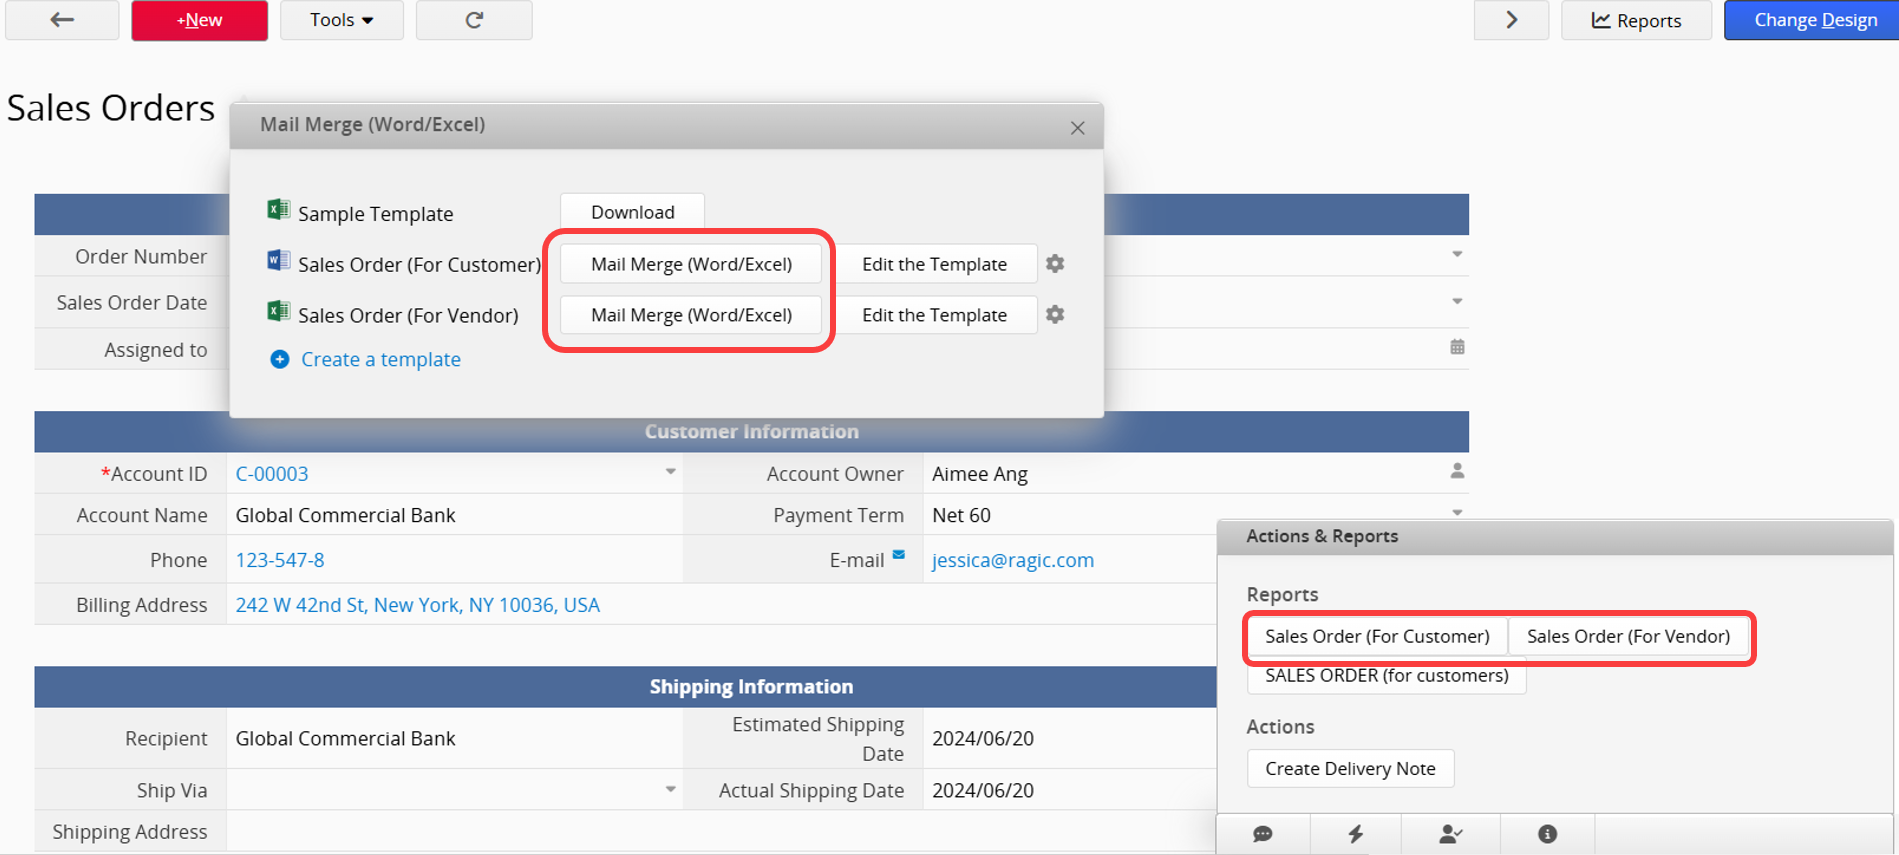
Go to the record's Form Page, open the Mail Merge settings window, or click the action button in the lower-right corner to export the record in Form Page format.
Clicking will directly download the exported file.
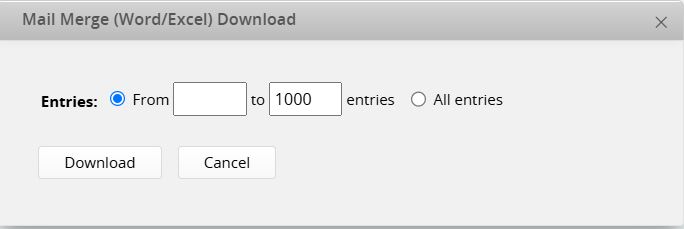
2. Exporting Multiple Records
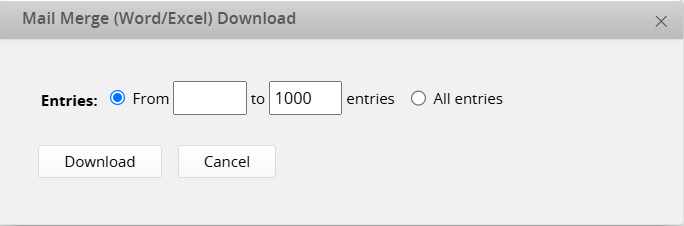
Open the Mail Merge settings window on the Listing Page (or in the lower-right corner), click the Mail Merge button, and select the range of records and the export option.
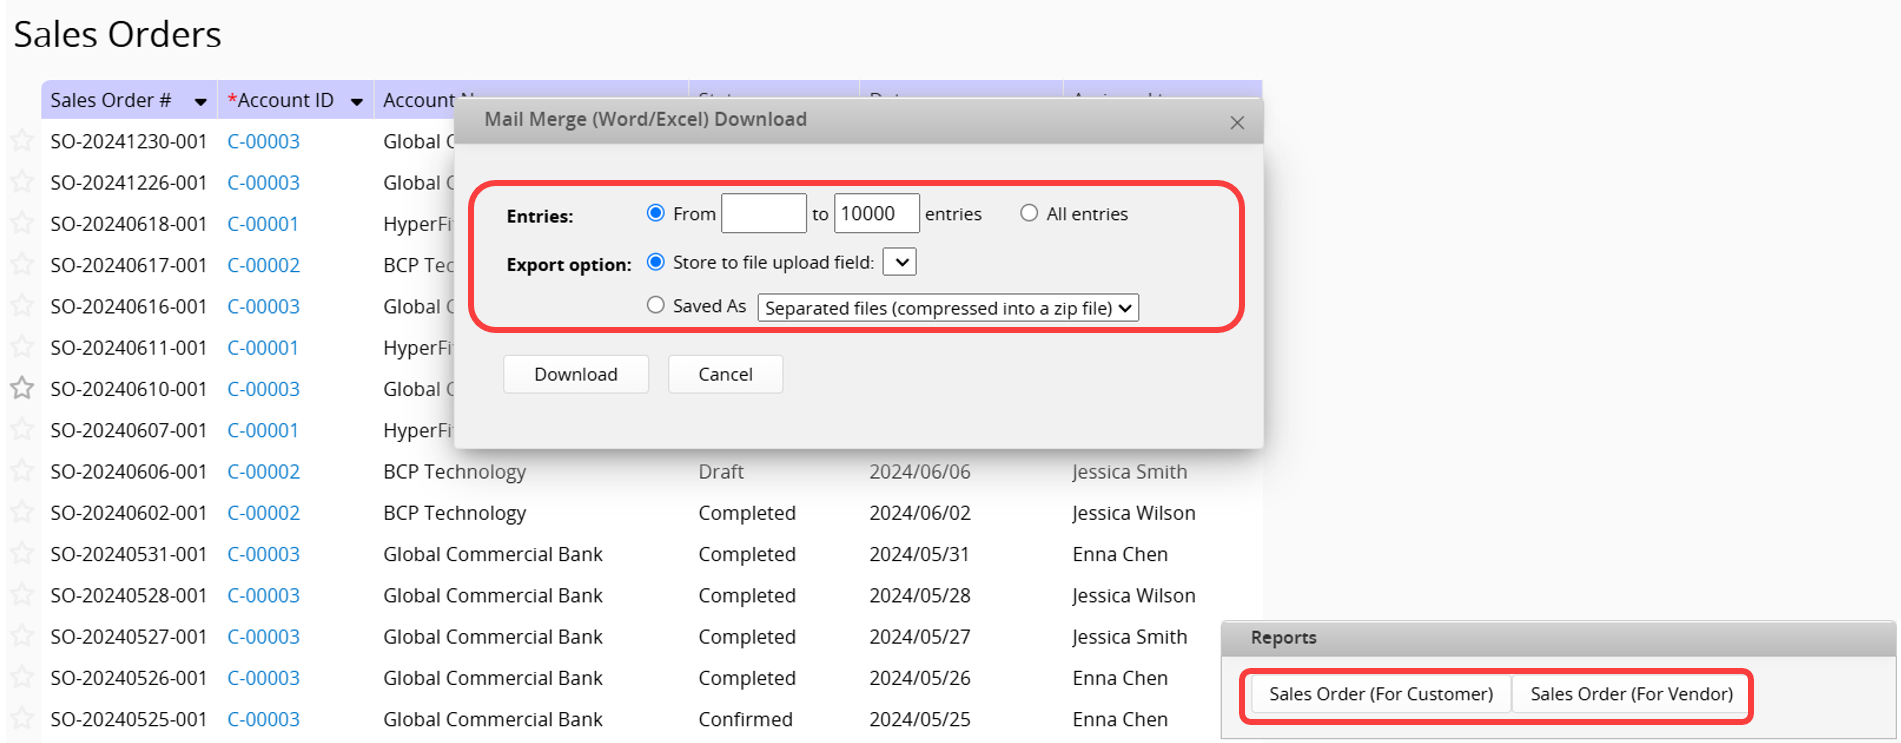
There are two export options:
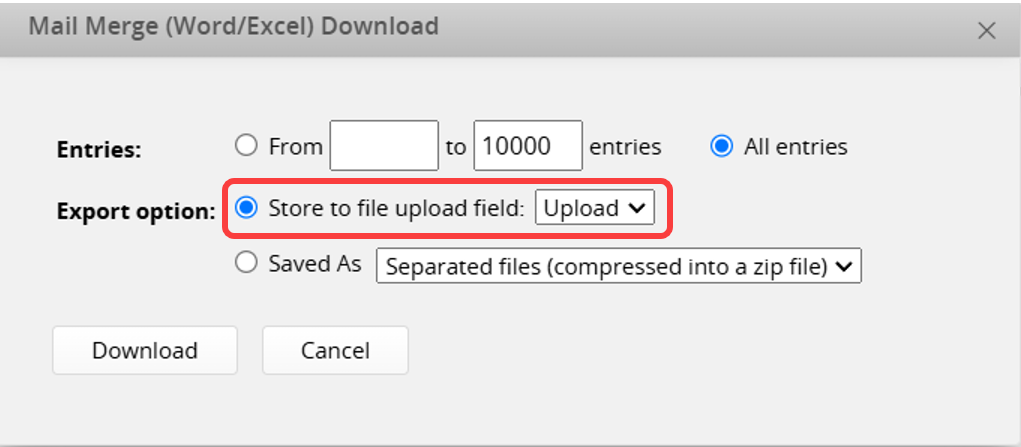
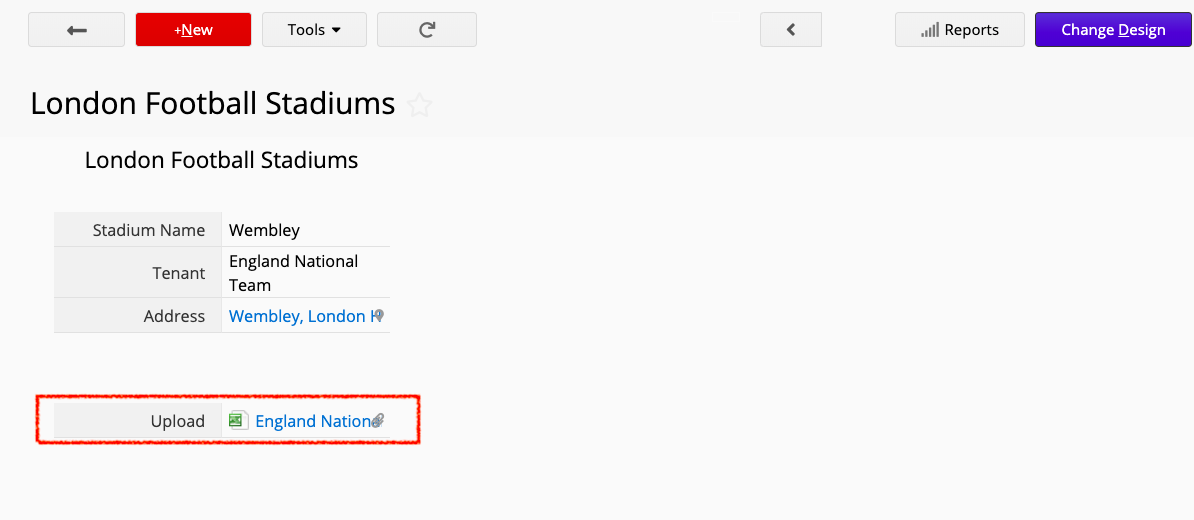
(1) Storing to a File Upload Field
If your sheet contains a File Upload field, you can choose this option to upload the exported file to that field for the specific record.
(2) Saved As Files
The available download options vary depending on the export file format:
Excel: A single file (separated by tabs), Separated files (compressed into a zip file), or A single file (containing multiple entries within one tab).
Word: Separated files (compressed into a zip file) or A single file.
Note: The current limit for saving a single file with Mail Merge is 300 records per Excel file and 100 records per Word file. If you need to export more than this limit, please select Store to a File Upload Field or choose the Save as separate files option.
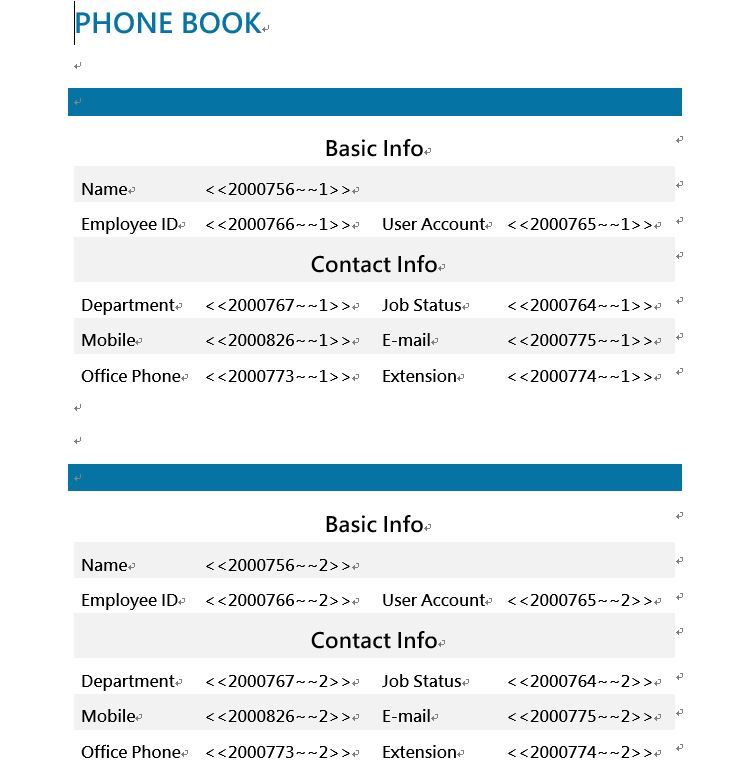
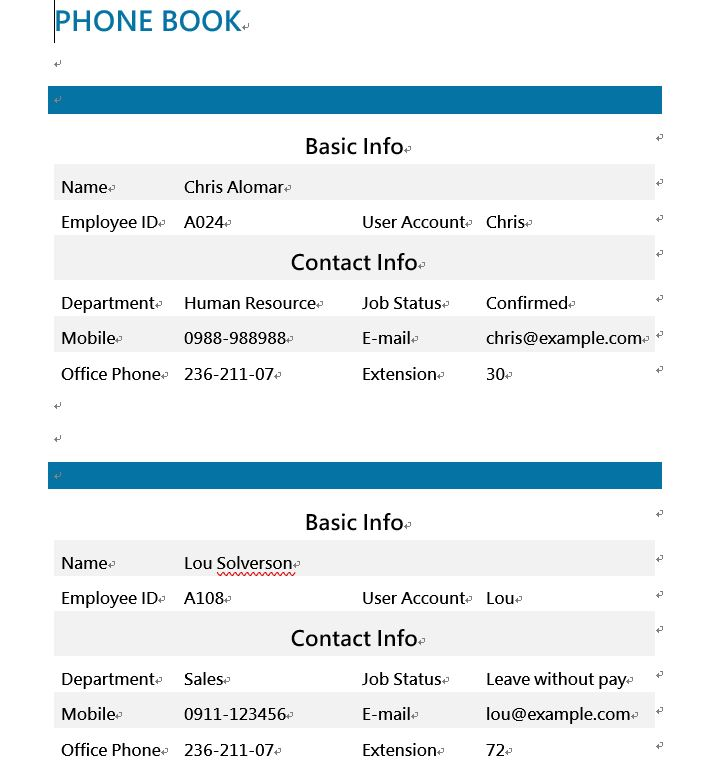
By default, Mail Merge outputs one record per page. However, if you wish to display multiple records on the same page (e.g., for creating a directory, labels, or business cards), you can use the Word format to create the template.
Note: While the Excel format doesn't support this export format, you can achieve a similar result by selecting Save as a single file (containing multiple entries within one tab) when exporting in Form Page format.
In a Word template, change the parameters to <<Field Name or ID ~~1>>, <<Field Name or ID ~~2>>, and so on, and configure the number of records to display on one page. Note that the uploaded template should be "limited to one page"; templates with multiple pages will not function properly.
Refer to the example below:
Templates for the "Multiple Records per Page" format can only be uploaded to the Listing Page. After opening the Mail Merge settings window, click Create a Template, select the file under Template Upload, name the Mail Merge template, choose Upload Template for Listing Page, and click Upload.
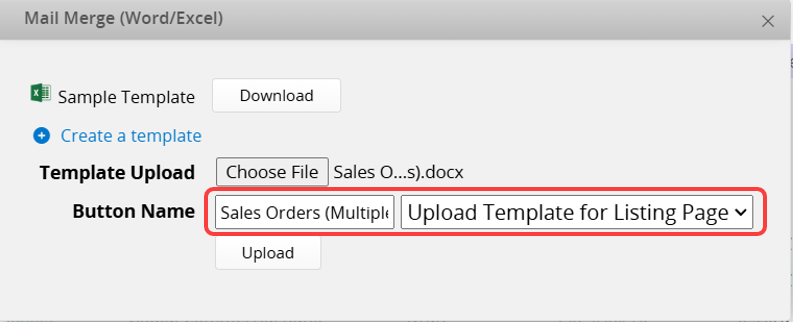
Note: Uploading on the Form Page or selecting "Upload Template for Form Page" will fail to export.
Open the Mail Merge settings window on the Listing Page (or in the lower-right corner), click the Mail Merge button, and select the range of records to export.
This enables multiple records to be output on one page.
To export in the Listing Page format, you can only use the Excel template, as Word cannot export the Listing Page format.
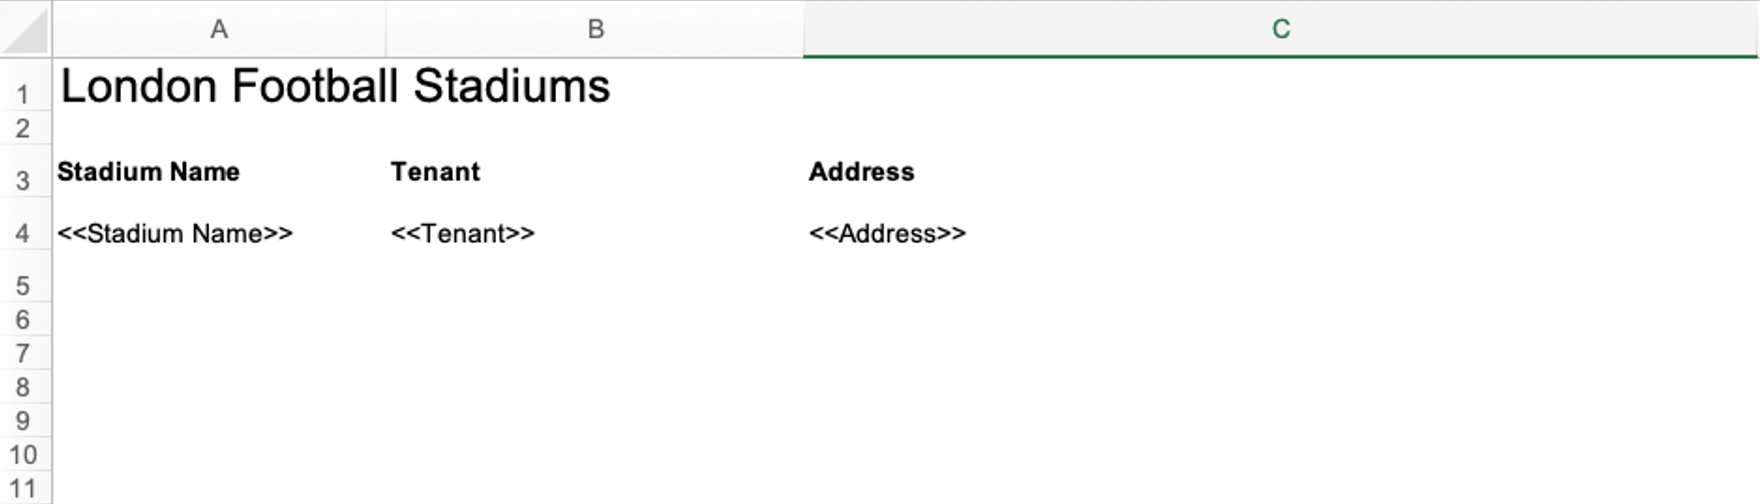
In the Excel template, arrange the fields to be output according to the layout of the Listing Page format.
Using Formulas
You can apply formulas in the Mail Merge template to calculate your records on the Listing Page by adding the formula in the following format.
<<FORMULA:(enter your formula here)>>
Note: Please use Excel formulas here. Ragic formulas are not supported.
In the formula you enter, you can also set up "dynamic parameters" so the system can automatically calculate based on the selected cell value. There are two types of dynamic parameters:
{{r}}: Automatically replaced by the current row.
{{l}}: Automatically replaced by the last row of the selected column.
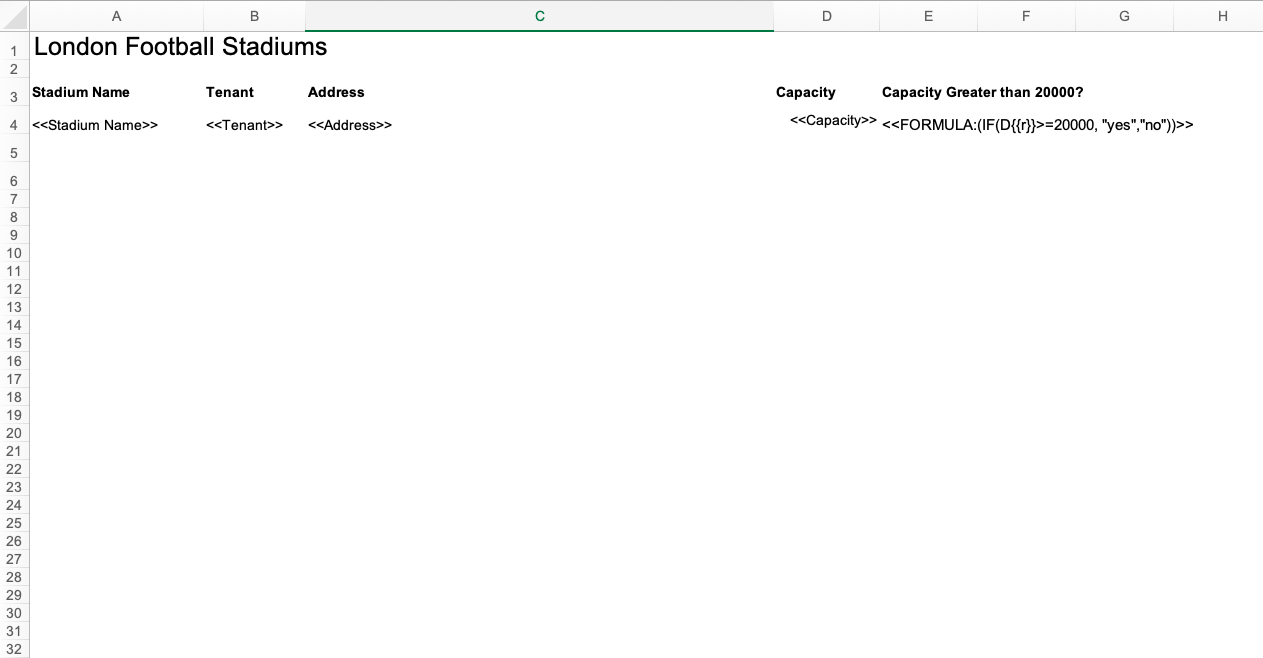
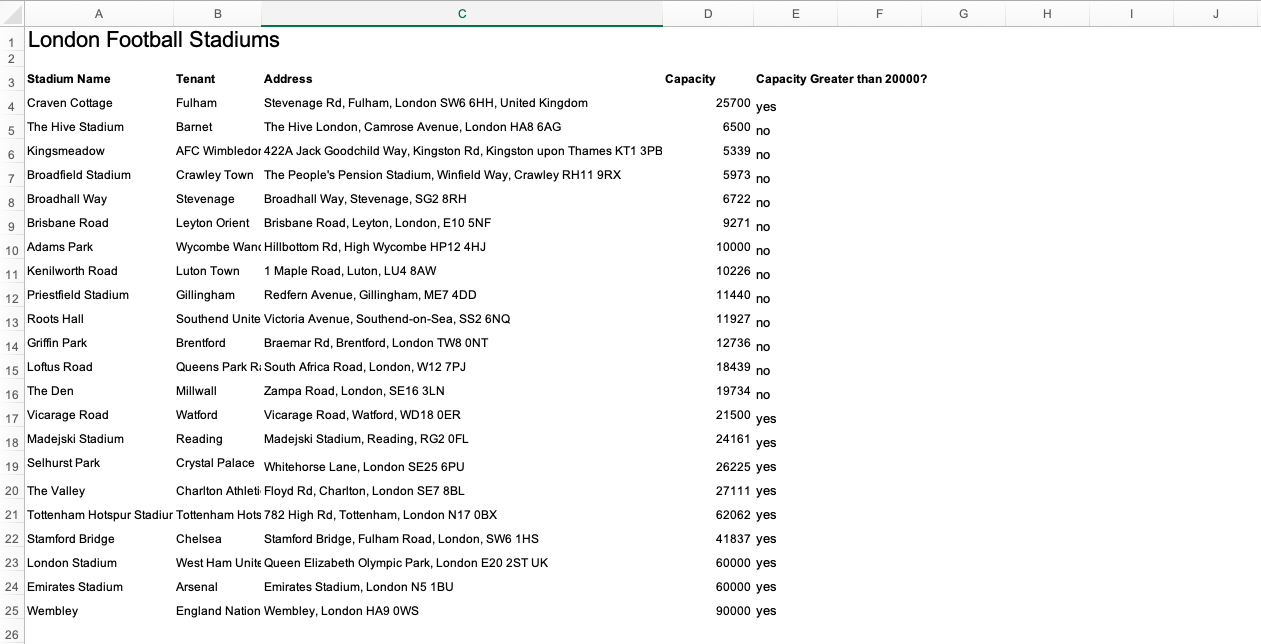
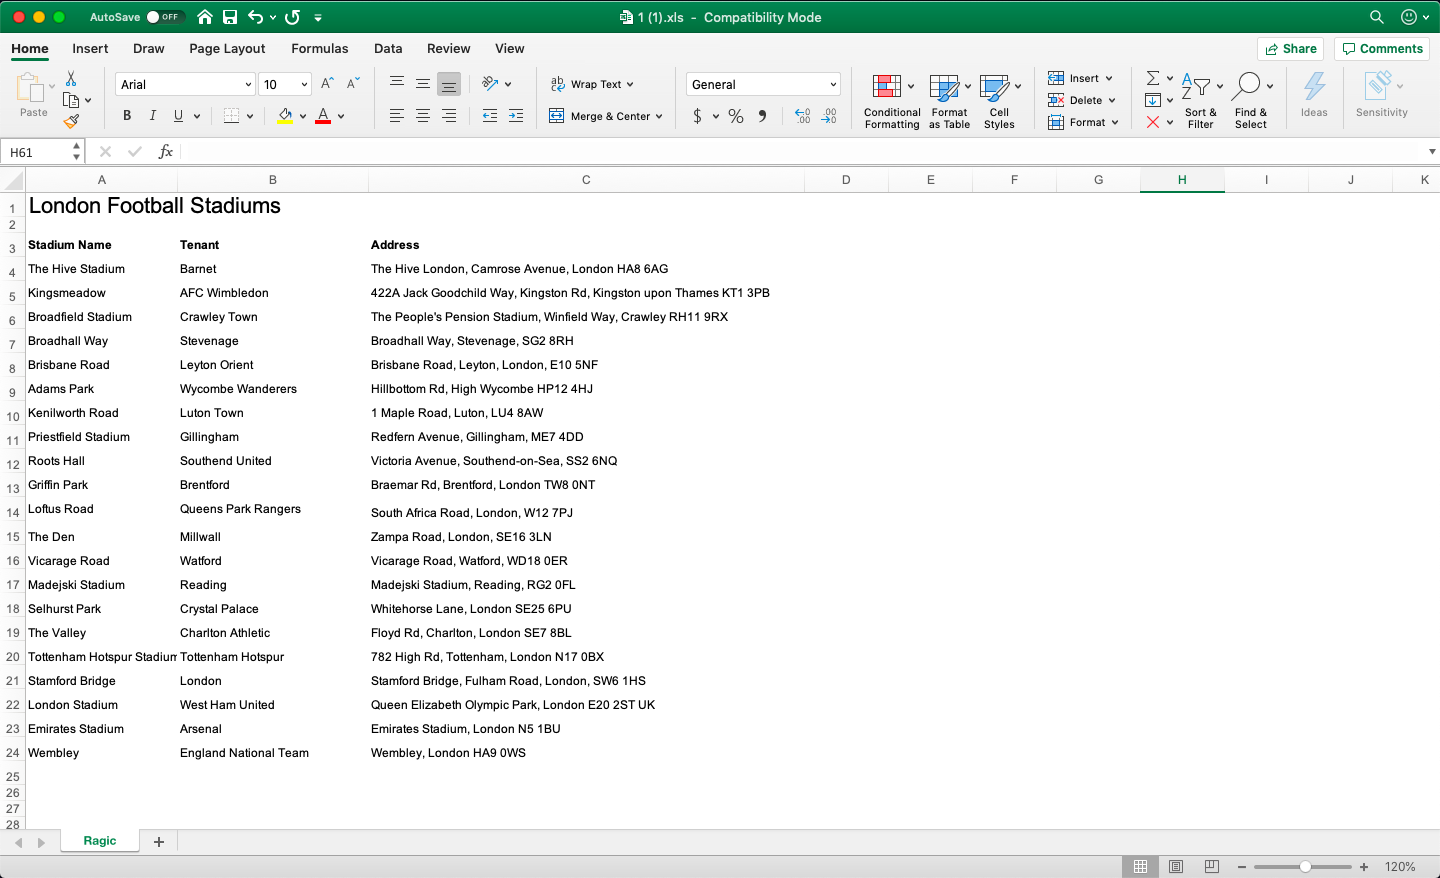
For instance, if you want to check whether the capacities of these stadiums are greater than 20,000, you can use this function in the template:
<<FORMULA:IF(D{{r}}=20000, "yes", "no")>>
It will output the following results.
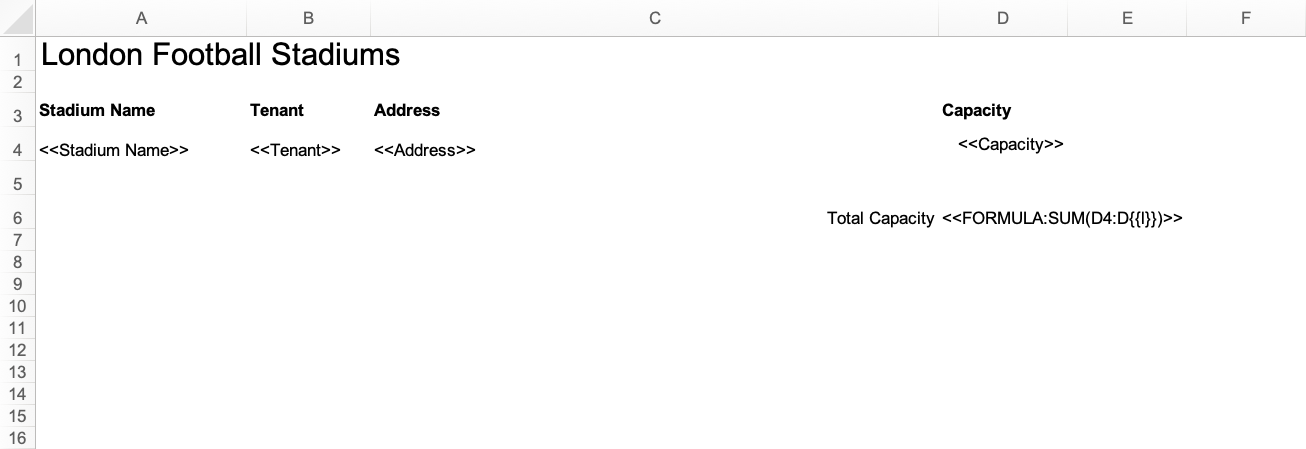
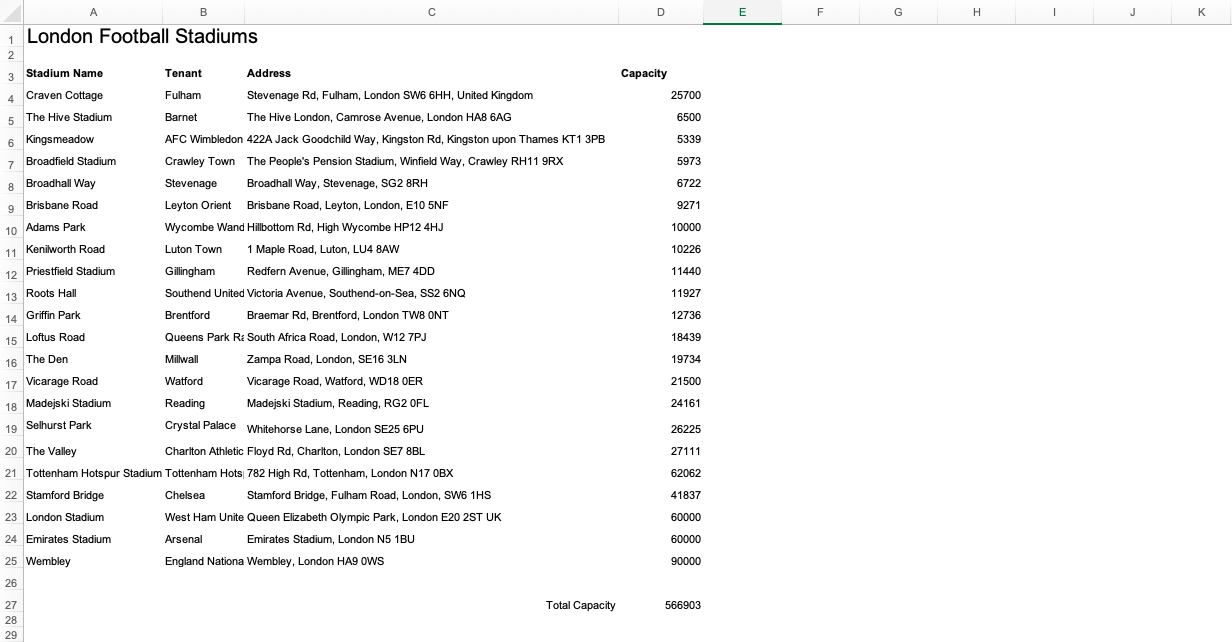
On the other hand, you can use the dynamic parameter {{l}} when you want to calculate the total capacity of all stadiums. In that case, you can use the following function:
<<FORMULA:SUM(D4:D{{l}})>>
When setting up a summation formula, you need to include the cell of the first record to be calculated in the formula. In this example, it is D4.
It will output the following results.
You can upload a Listing Page format template on both the Listing and Form pages. After opening the Mail Merge settings window, click Create a Template, select the file under Template Upload, name the Mail Merge template, choose Upload Template for Listing Page, and click Upload.
Note: If you upload a Listing Page format on the Form Page, the Mail Merge button will not appear on the Form Page. It will only be displayed on the Listing Page.
You can only export the Listing Page format from the Listing Page.
You can either filter the records on the Listing Page first or directly open the Mail Merge settings window (or from the lower-right corner), click the Mail Merge button, and select the range of records to export.
After uploading the template, you can configure the following settings for the template:
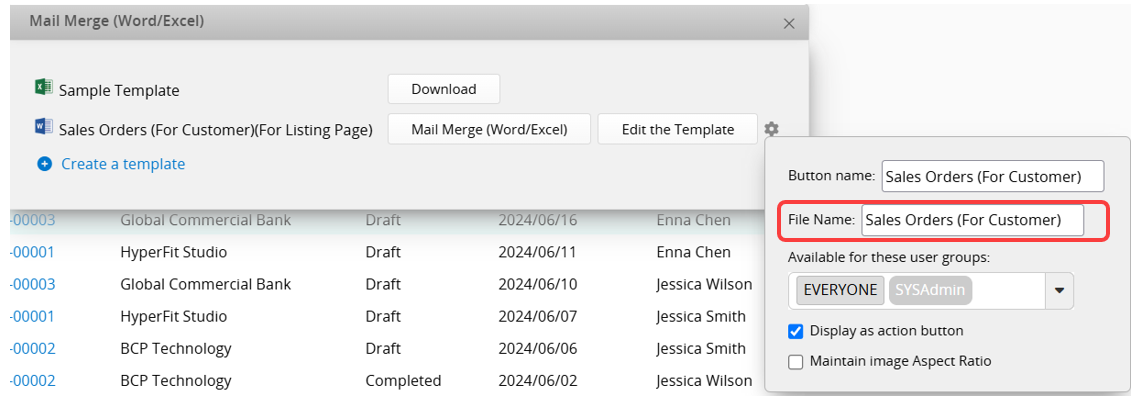
Click the Edit the Template button next to the Mail Merge button to upload or download the template, or to delete it.
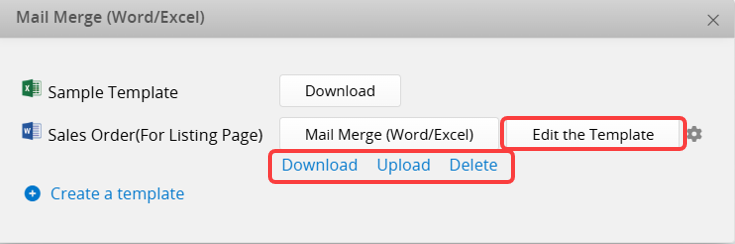
The gear icon on the right of each template allows you to modify its Access Rights.
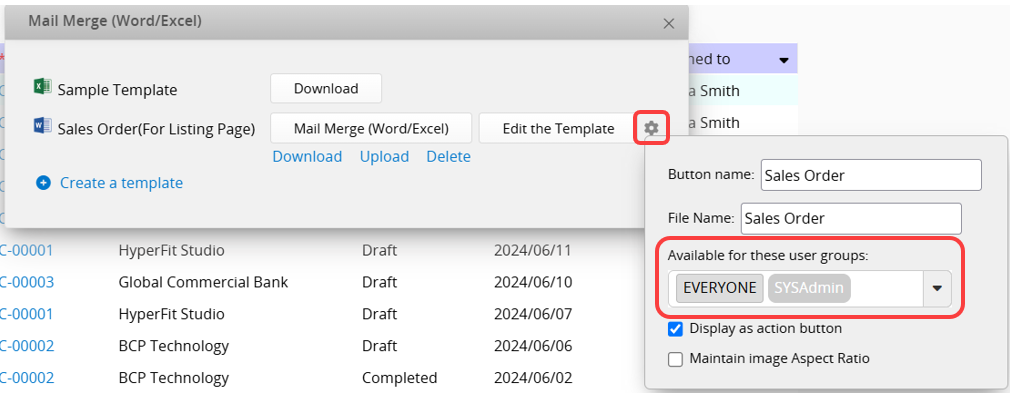
Form Page Mail Merge
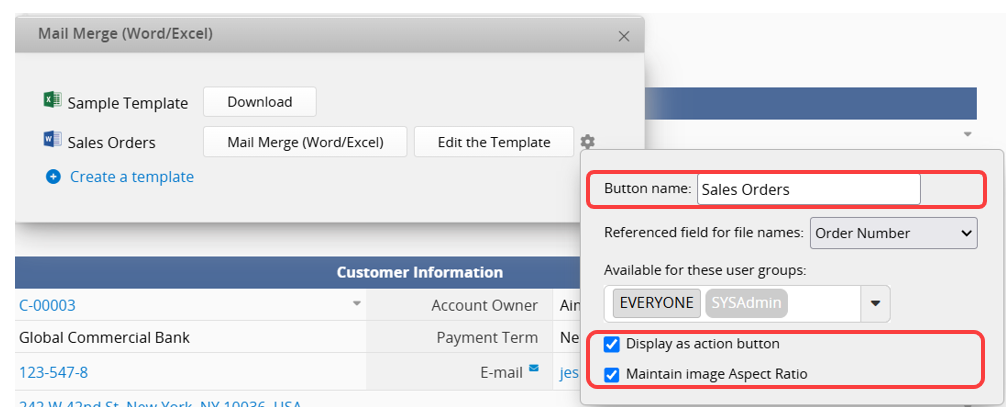
In the gear icon on the right of each template, select the reference field to apply the field values to the file name.
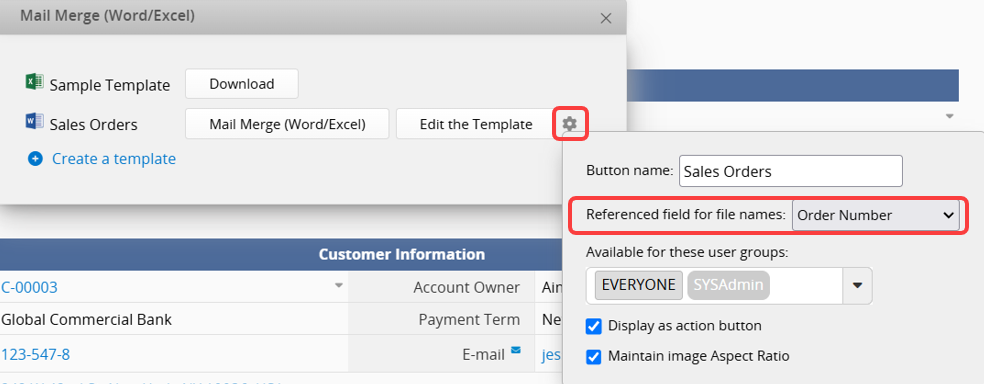
Listing Page Mail Merge
Click the gear icon on the right of each template to customize the file name.
Click the gear icon on the right of each template to configure the following settings:
1. Change the button name.
2. If the record contains images, you can choose whether to Maintain Image Aspect Ratio.
3. Set whether to display this Mail Merge template as an Action Button.
Note: Since Mail Merge is not actually an Action Button, but rather a "shortcut" button for easy exporting, it does not support additional settings or combining with other Action Buttons. For more details about the types of action buttons, please refer to this section.
After filtering or selecting records on the Listing Page, you can Batch Execute the Mail Merge.
Please view the video below for a step-by-step tutorial:
1. The format of Mail Merge is fixed, meaning that the heights of rows will not be automatically adjusted after exporting Subtable entries. However, you can refer to this Excel instruction for how to adjust row height after exporting data onto Excel.
2. When restoring Previous Versions, the Mail Merge settings will also revert to their state at the time that version was saved.
 Thank you for your valuable feedback!
