 Design guide
Design guide
Design guide
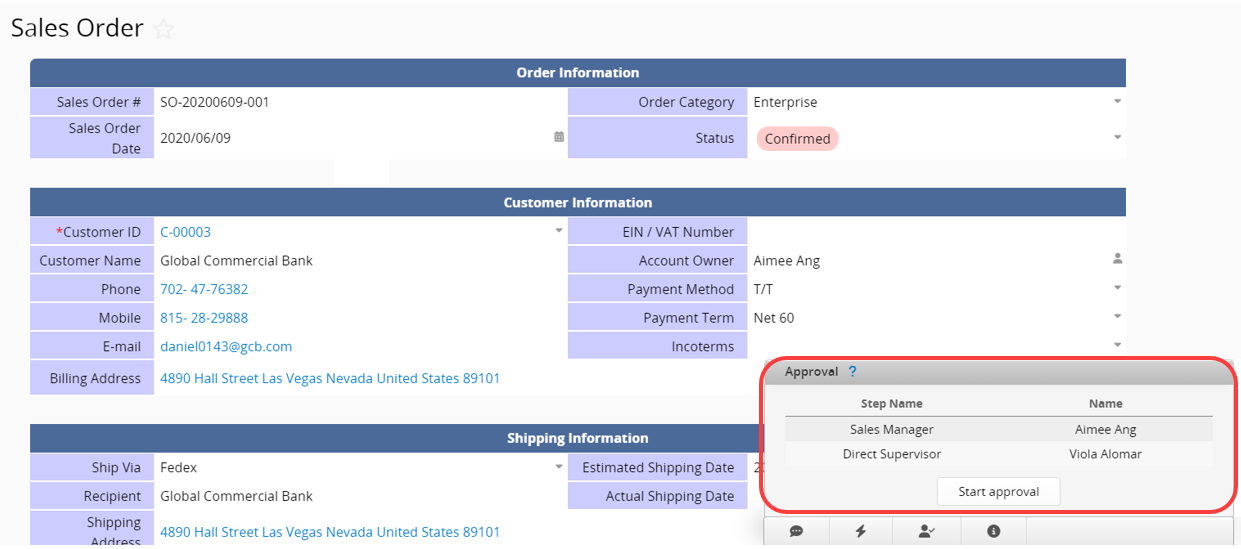
Through the Approval process, users can designate supervisors or specific individuals to review the submitted record.
For example, a leave request may go to the "Direct supervisor" for approval, while a Sales Order could require approval from the "Sales Manager". After a user adds a new entry and clicks Start approval, an email is sent to the first approver. Upon their approval, the system notifies the next approver in sequence, proceeding from top to bottom.
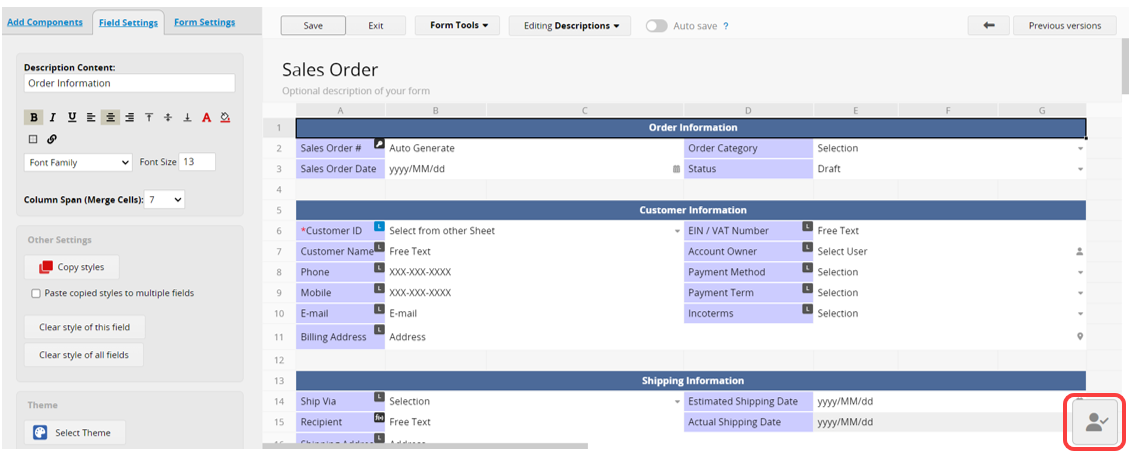
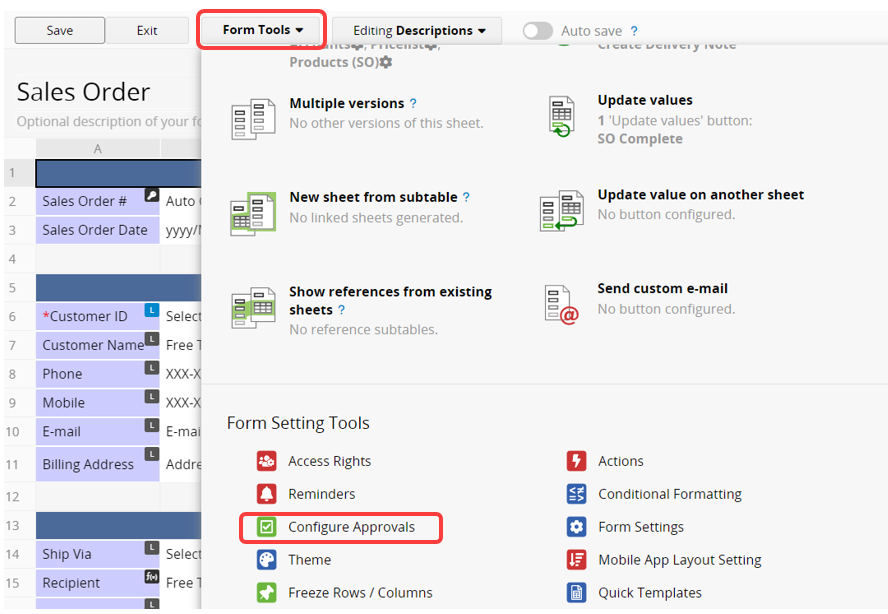
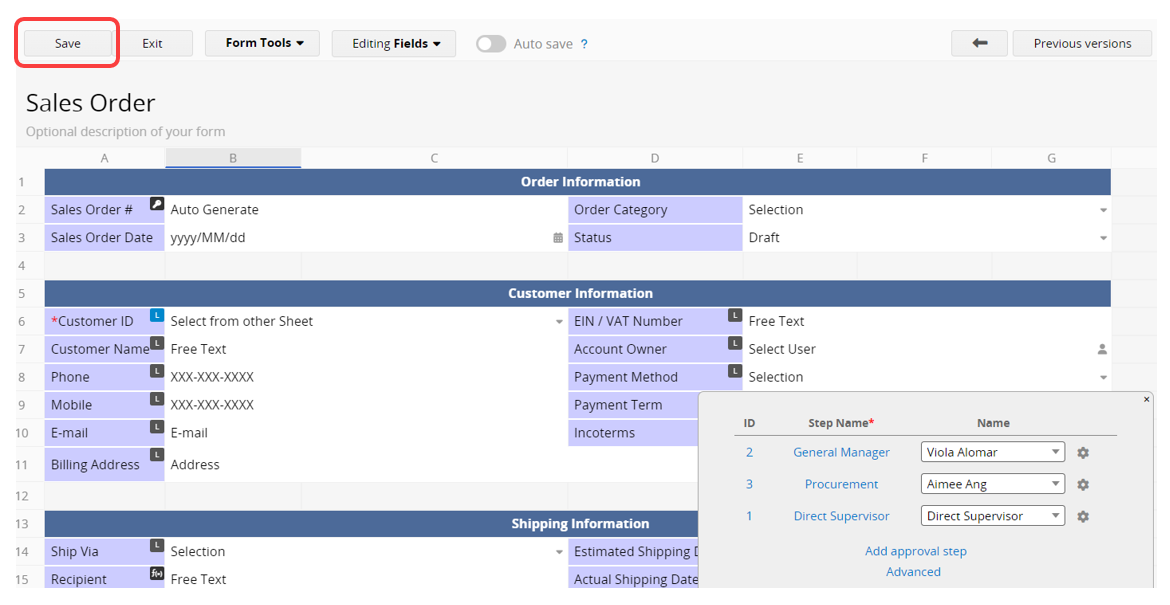
To open the approval setting interface, you can click on the lower-right icon in the Design Mode or access it from the Form Tools.
Click Add approval step to add the Approval process.
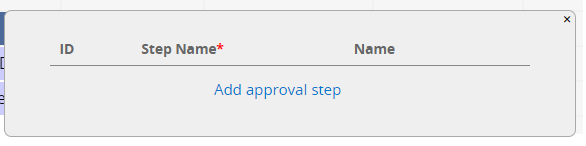
Set the Step Name, which is mandatory, for an approval step such as "Purchasing Manager" or "Project Manager".
In the Name field, specify the User for a fixed approver, or choose a user group where an approver can be selected from when submitting for approval.
You can choose approvers from the Organizational menu with the following options:
1. Direct Supervisor sends the request to the user's direct supervisor.
2. Supervisor of Supervisor directs the request to the user's supervisor's supervisor.
3. Supervisor of Previous Approver routes the request to the previous approver's supervisor.
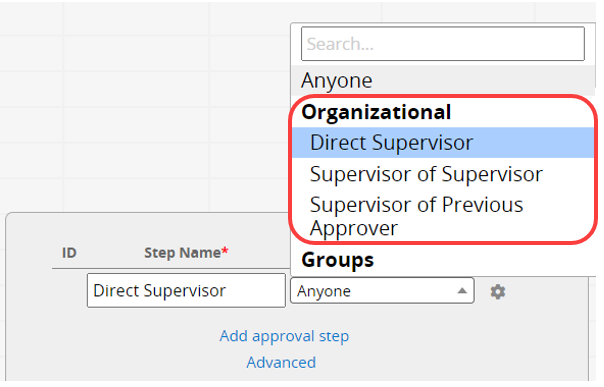
Note: To enable the approval functionality for direct supervisors and their supervisors, you will need to use the Direct Supervisor field in the system User sheet. If this field is not available in your sheet, please contact Ragic support to update it.
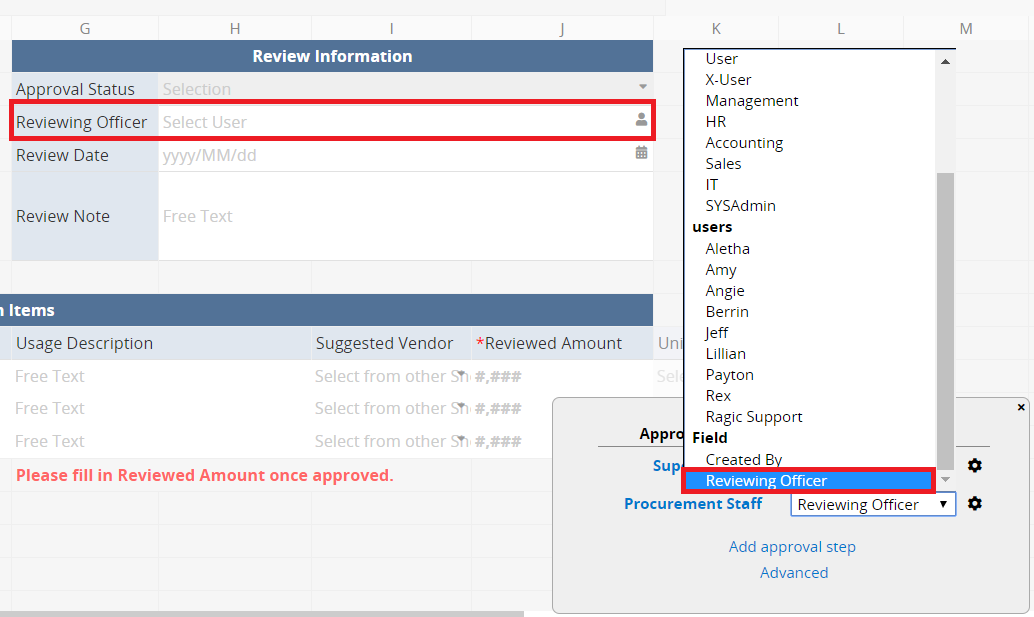
You can also select approvers from the Select User or Select Group field.
For example, you can send an approval request to the "Reviewing Officer" (the designated approver in charge) of this record instead of selecting someone from the "Procurement group" as an approver.
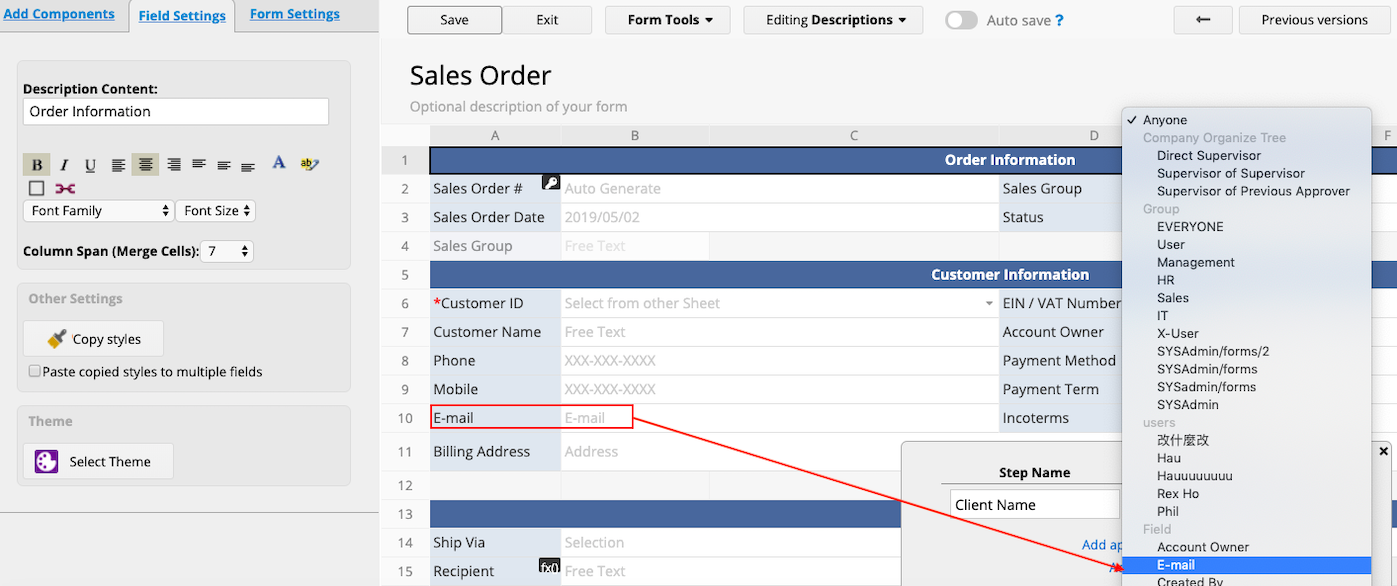
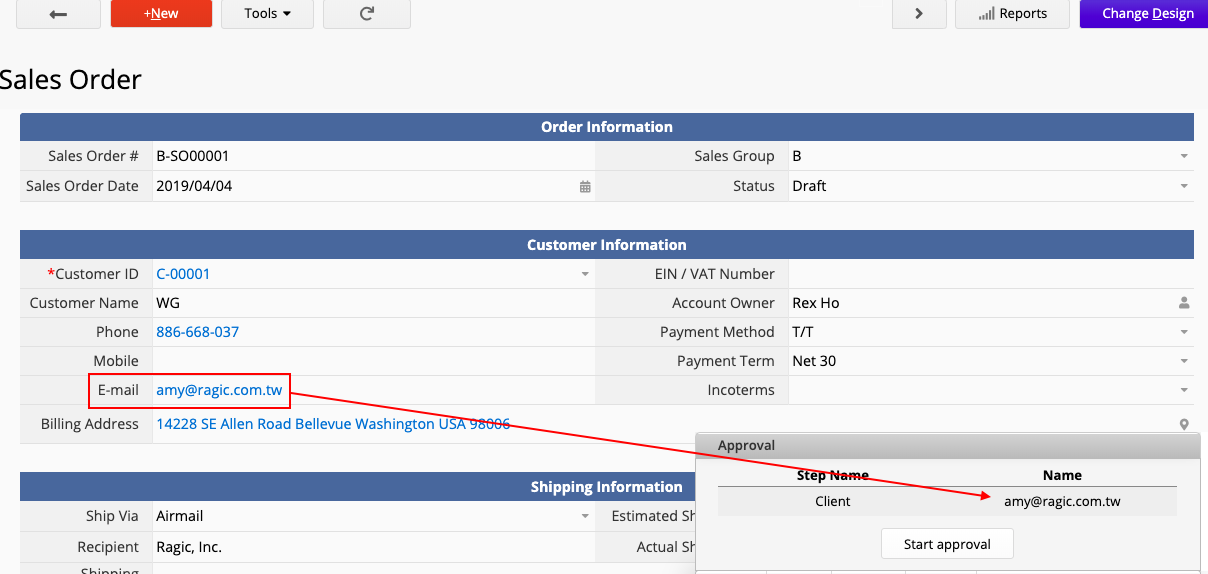
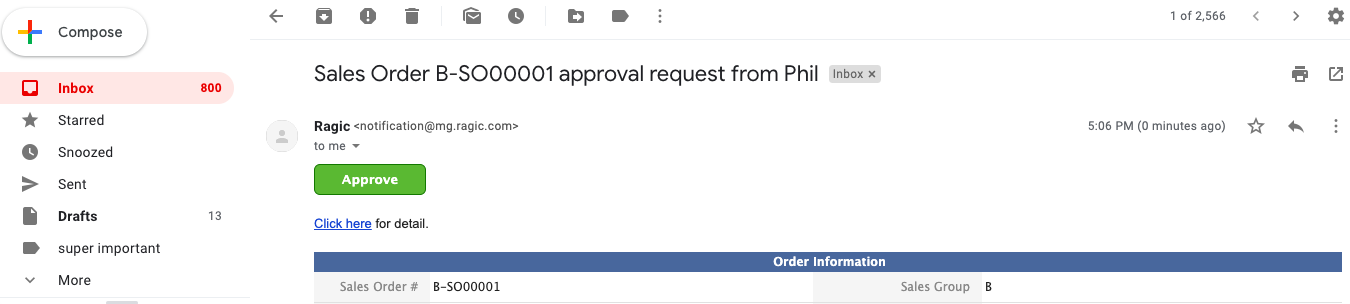
If you want to set non-users (such as clients and suppliers) as request approvers, you can choose the "E-mail" field. The approval request will then be sent to the designated email address, and it can be directly approved from the email.
You may also rearrange the order of approval using drag and drop.
Don't forget to "Save" before leaving.
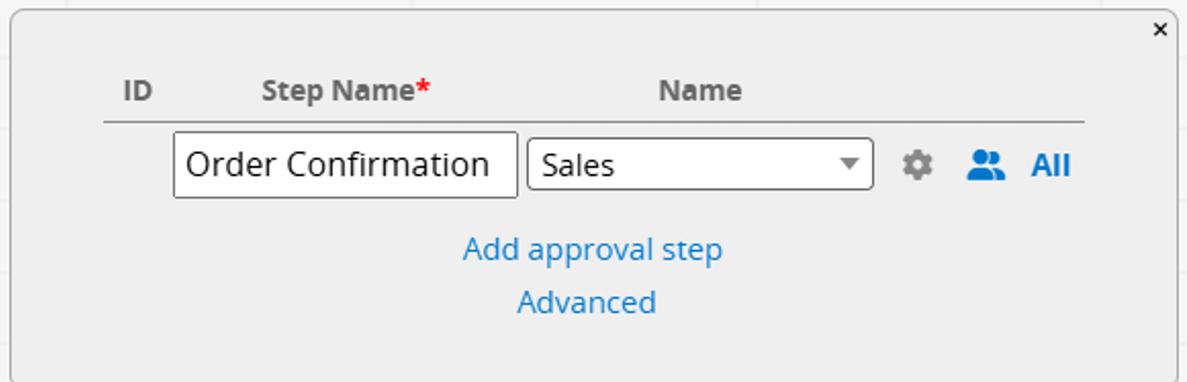
You can assign multiple approvers to the same approval step and configure Joint Approval or Approval Threshold settings based on your needs. This can be done in two ways:
1. Select a User Group, or choose a multiple-select Select User, Select Group, or E-mail field as the approver.
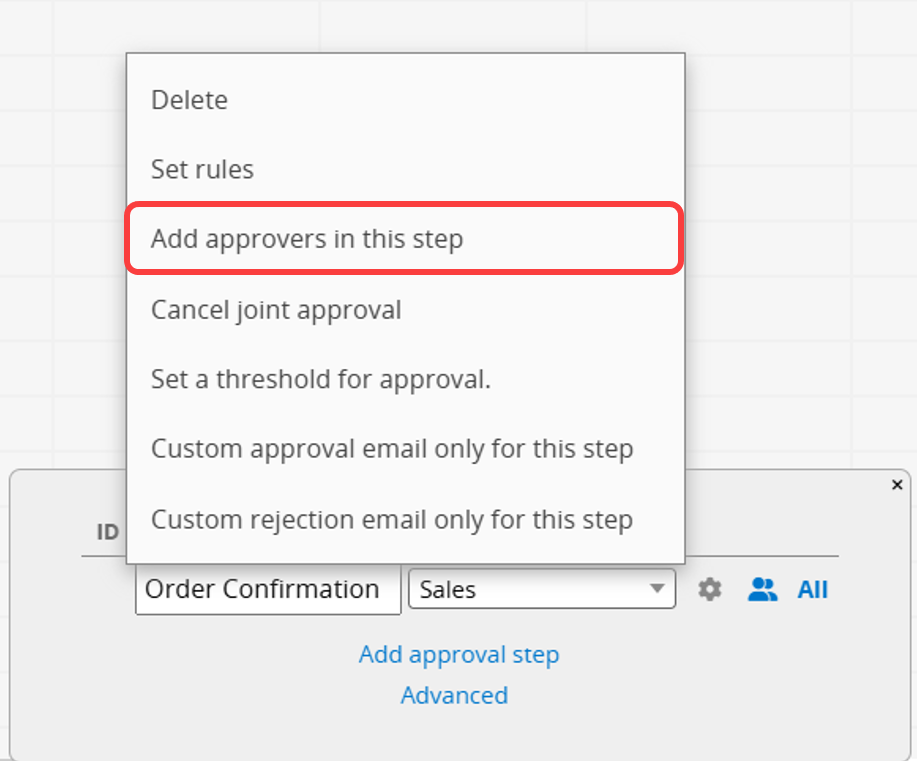
2. Click the gear icon next to the approval step and select Add approvers in this step, then select the approvers.
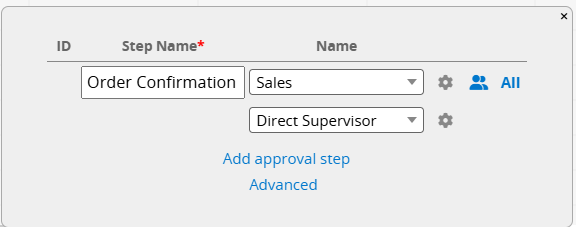
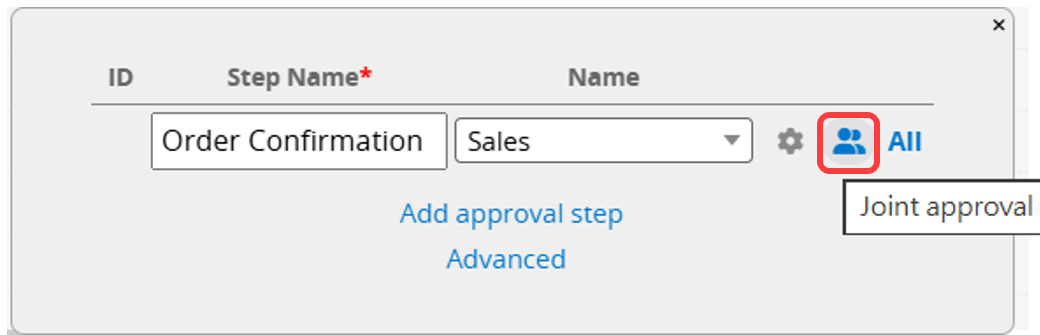
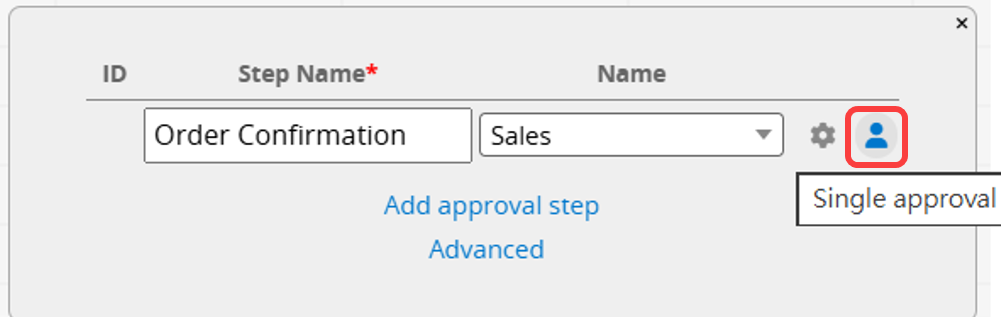
Once configured, a Joint approval or Single approval icon will appear next to the step. You can click the icon to toggle the Approval Type.
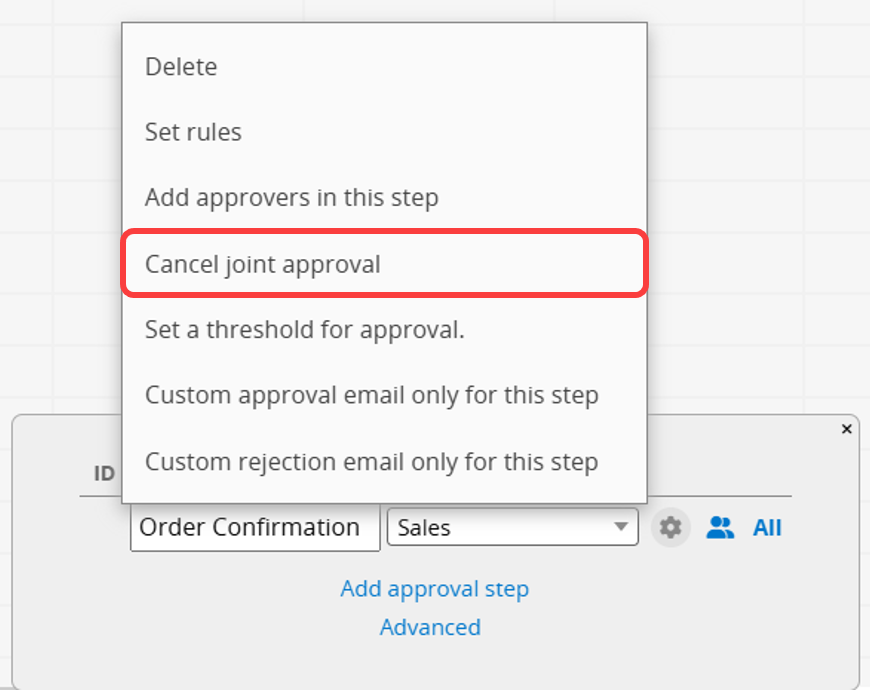
You can also configure this setting from the gear menu.
The following explains how to configure three different scenarios:
Confirm that the step displays the Joint approval icon + All.
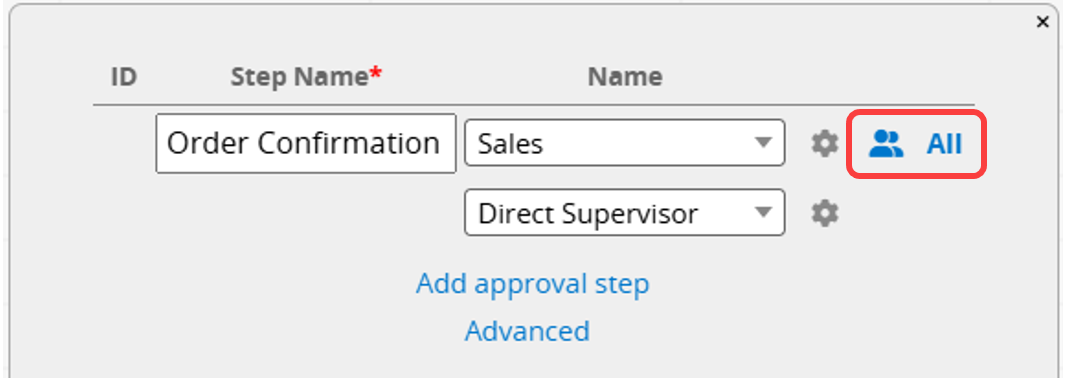
All approvers in this step must complete their approval. When the approval is started, notifications will be sent to all approvers in this step, and all of them must approve before proceeding to the next step.
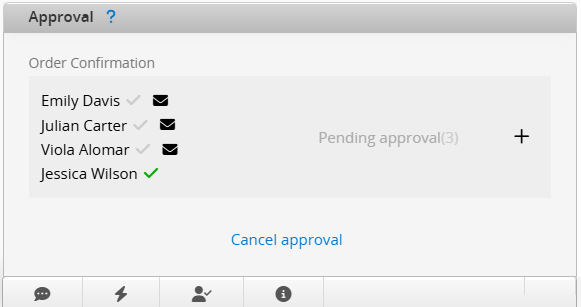
Confirm that the step displays the Joint approval icon, then click All next to the icon to set a threshold for approval.
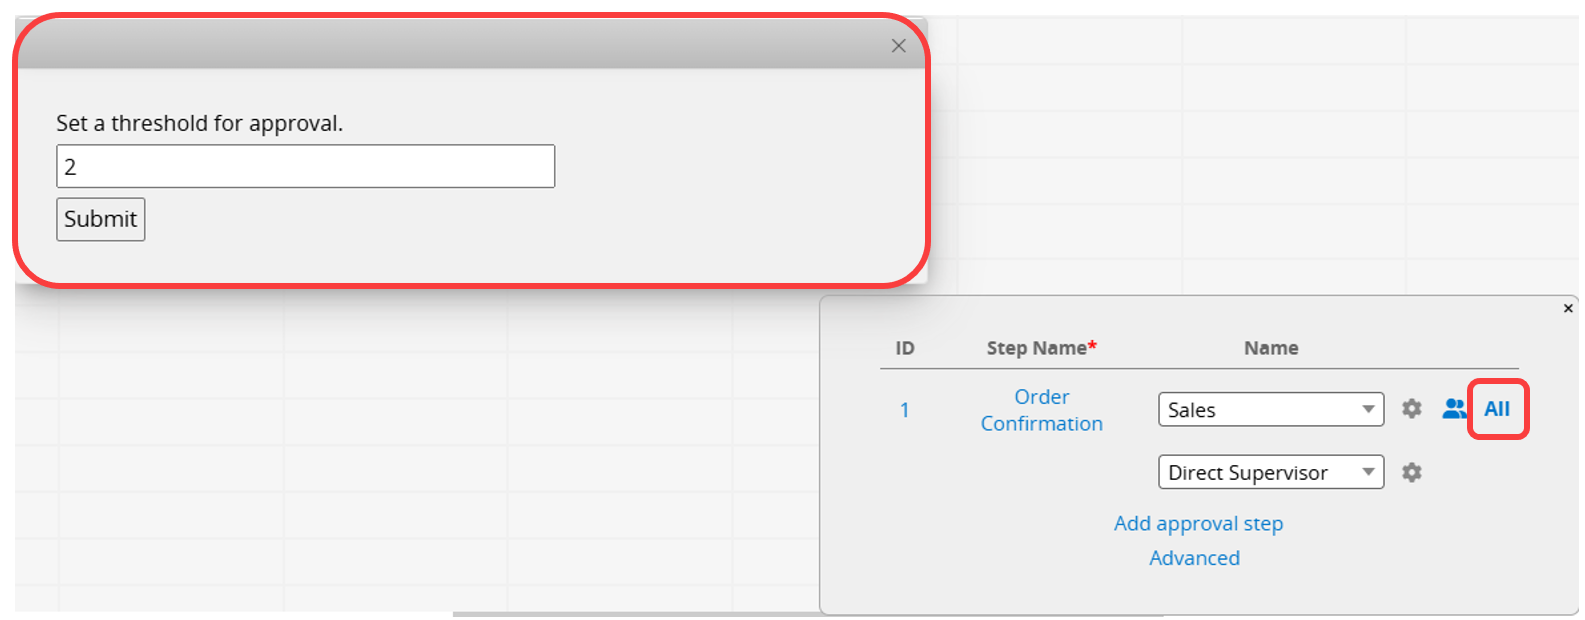
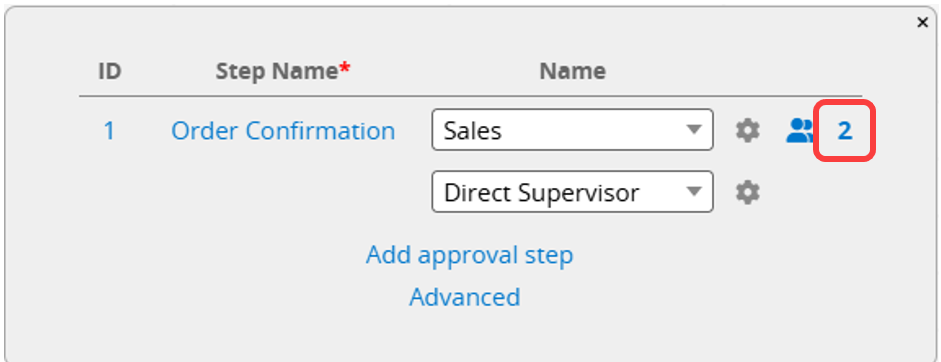
When the approval is started, notifications will be sent to all approvers in this step, but only the specified number of approvers need to complete their approval to proceed to the next step.
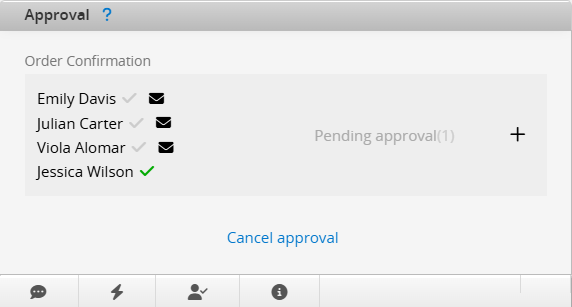
Note: If the number is cleared, it defaults back to All (Joint Approval), meaning all approvers in this step must approve.
Switch the icon on the right side of the approval step to Single approval.
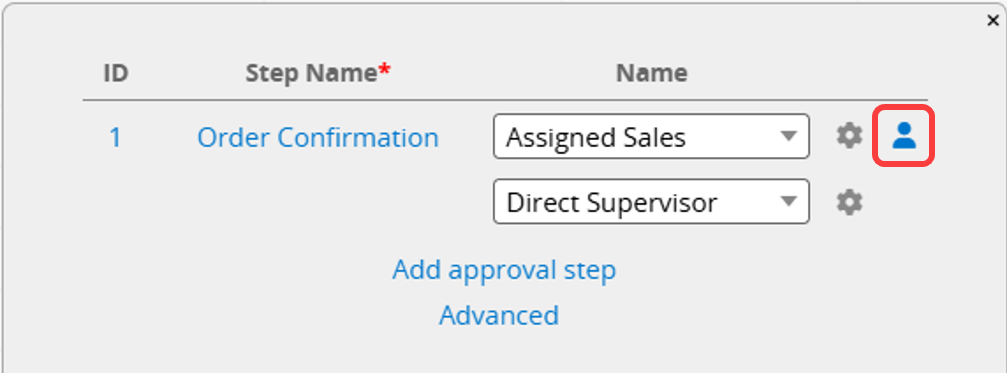
When the approval is started, select one approver from the users in this step.
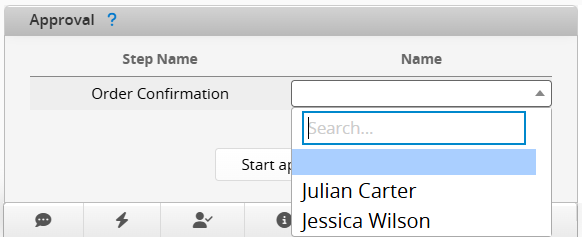
In some cases, you may want an approval to become uncancelable once it reaches a certain step, so users can't bypass a completed approval by canceling it and re-editing the record.
Click the gear icon next to the approval step, then click Prevent cancellation after approval. It will switch the option to Allow cancellation after approval, letting you turn this setting off.
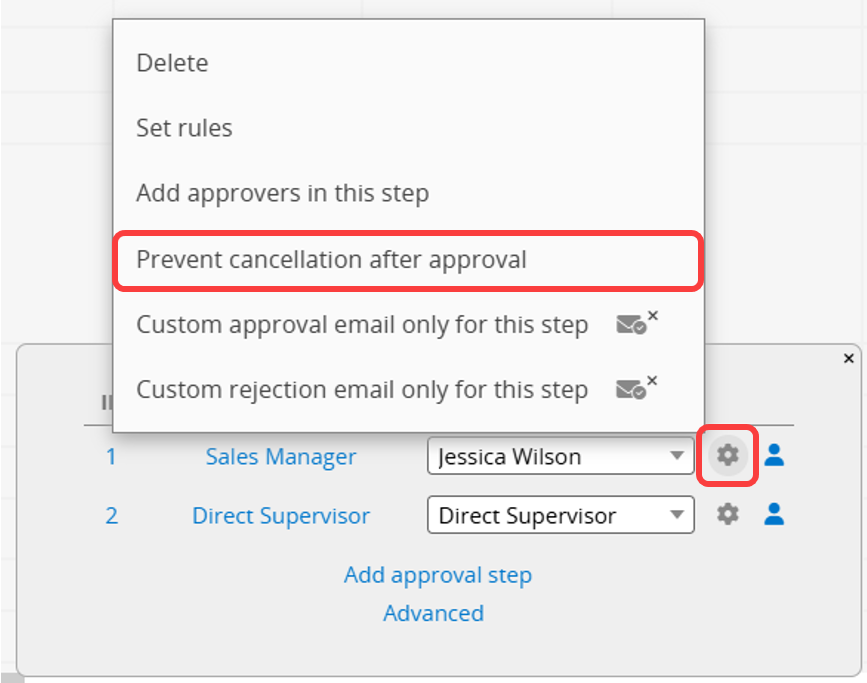
Once set, as soon as this step is actually approved, the record can no longer be canceled by anyone, including SYSAdmin, at any later step.
Note: If this step is skipped by an approval rule and never actually approved, this setting won't apply, and the record can still be canceled.
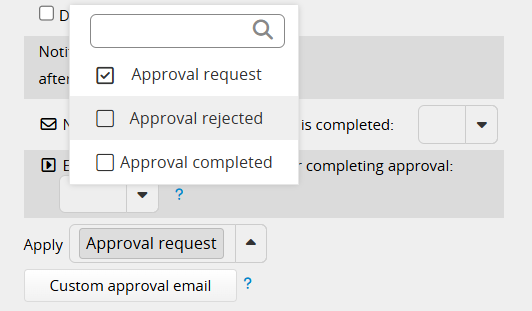
You can customize emails for Approval request, Approval rejection, and Approval completion. Approval emails can be configured in two ways: General Approval Email and Step-Specific Approval Email. Please note that approval completion notifications only support the General Approval Email. The following sections explain how to configure each way of approval email.
This email is sent regardless of the approval step. In Advanced Settings, you can choose whether to apply customized General Approval Emails for Approval request, Approval rejection, or Approval completion.
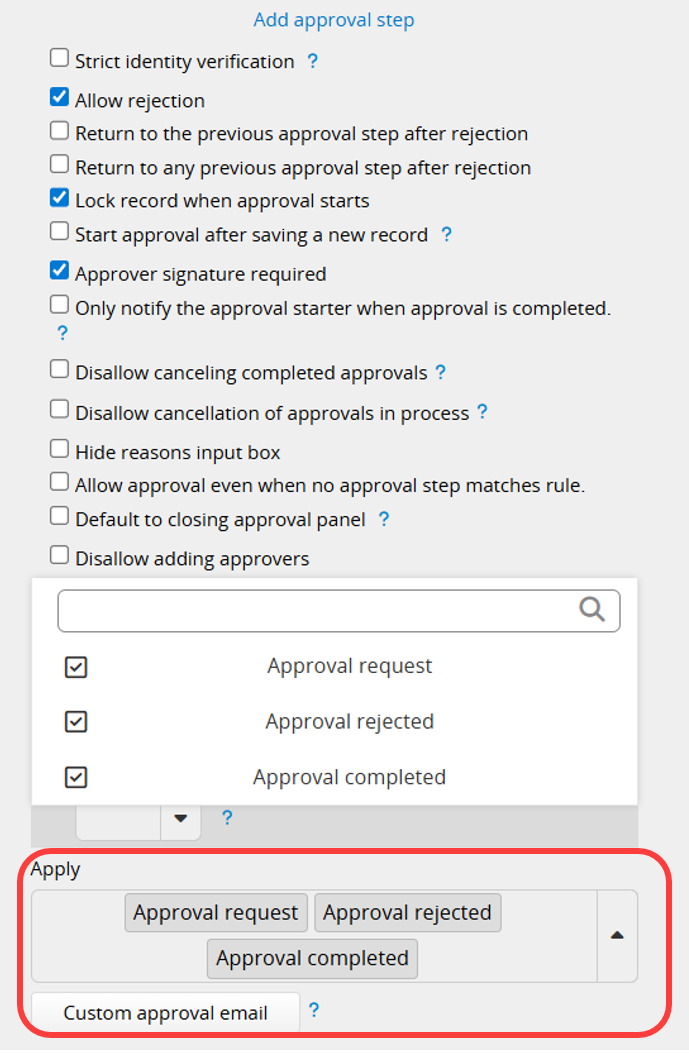
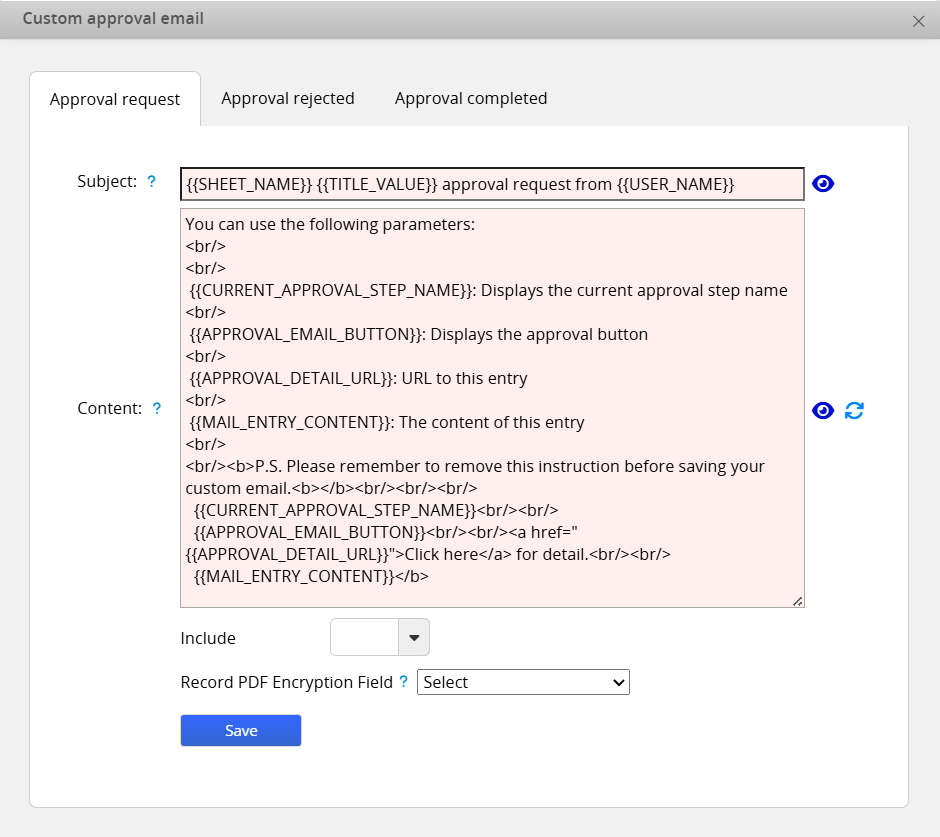
Click the Custom Approval Email button to edit the email content. You can switch between different email types using the tabs at the top, and enter text or apply supported variables to design the email template. For detailed settings, please refer to this article.
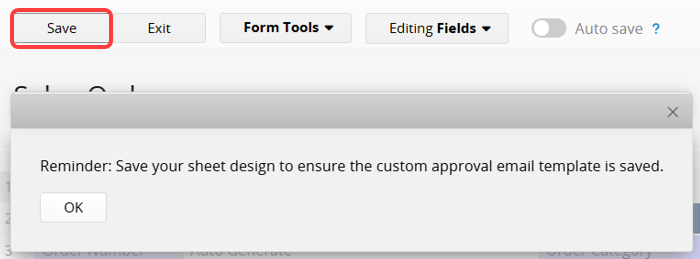
Remember to save the sheet design to ensure the custom approval email template is saved.
Note: If the corresponding email type is not enabled, or the customized content is not saved, the system will automatically use the Default Approval Email.
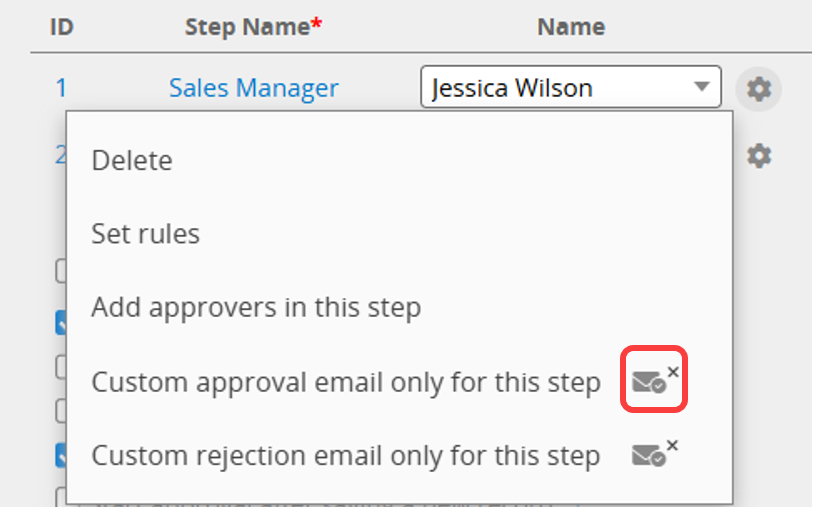
This email is sent for a specific approval step. Click the gear icon next to the approval step and select Custom approval email only for this Step or Custom rejection email only for this Step to configure email content for that step.
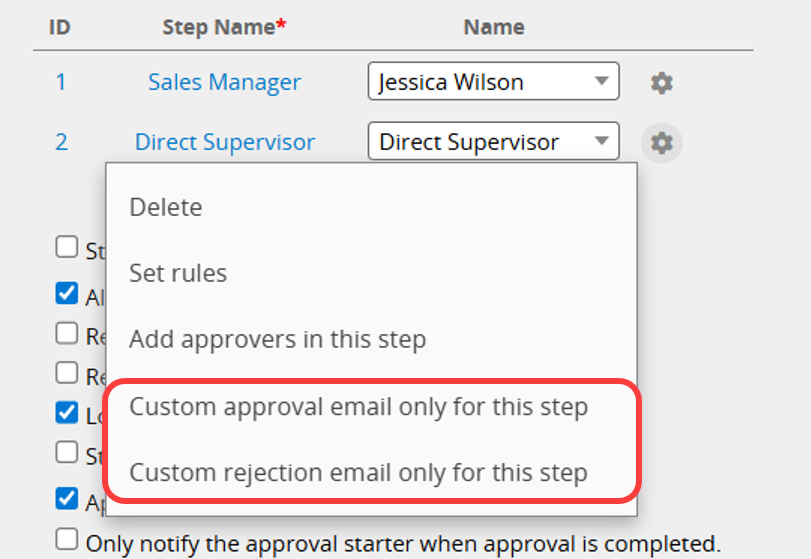
The customization process for Step-Specific Approval Email is the same as General Approval Email, including support for entering text and applying variables.
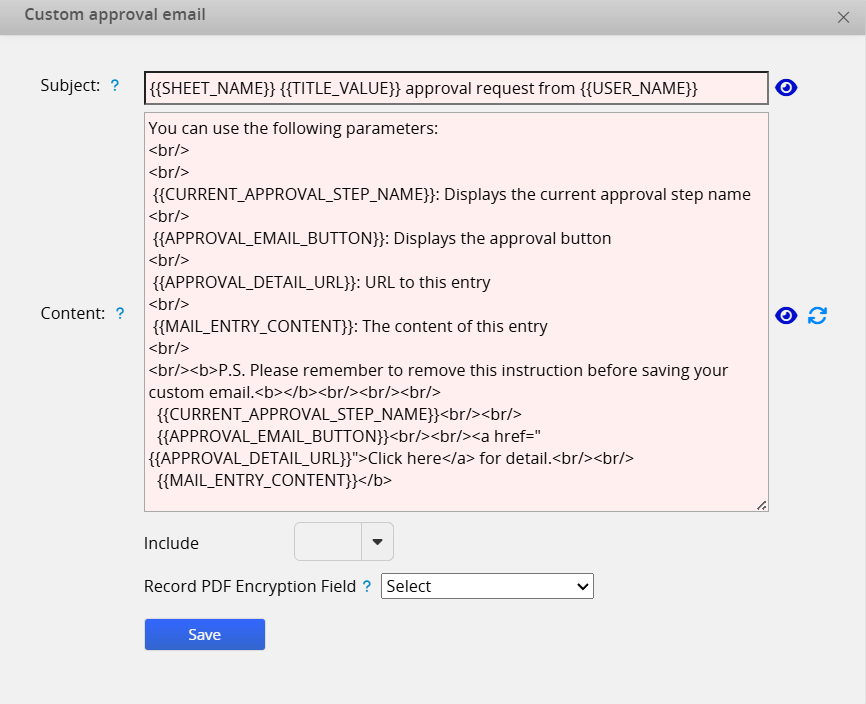
Remember to save the sheet design to ensure the custom approval email template is saved. After saving, an "E-mail" icon will appear next to the step where a customized email has been applied.
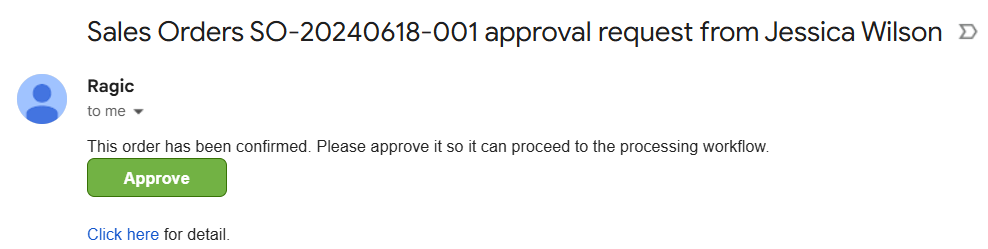
Once the approval request is submitted, the approver will receive the customized approval email.
Notes:
1. Variables cannot be applied to a single Subtable field. They can only display all field data in the Subtable. For more details, please refer here.
2. The priority for sending emails is as follows:
Step-Specific Approval Email > General Approval Email > Default Approval Email.
3. Add a new step before or after this step: these actions create new steps that were not originally in the approval process. In this case, the General Approval Email is sent first. If no customized email is set, the Default Approval Email will be sent.
1. General Approval Email: In Advanced Settings, uncheck the corresponding email type. After removal, the system will send the Default Approval Email instead.
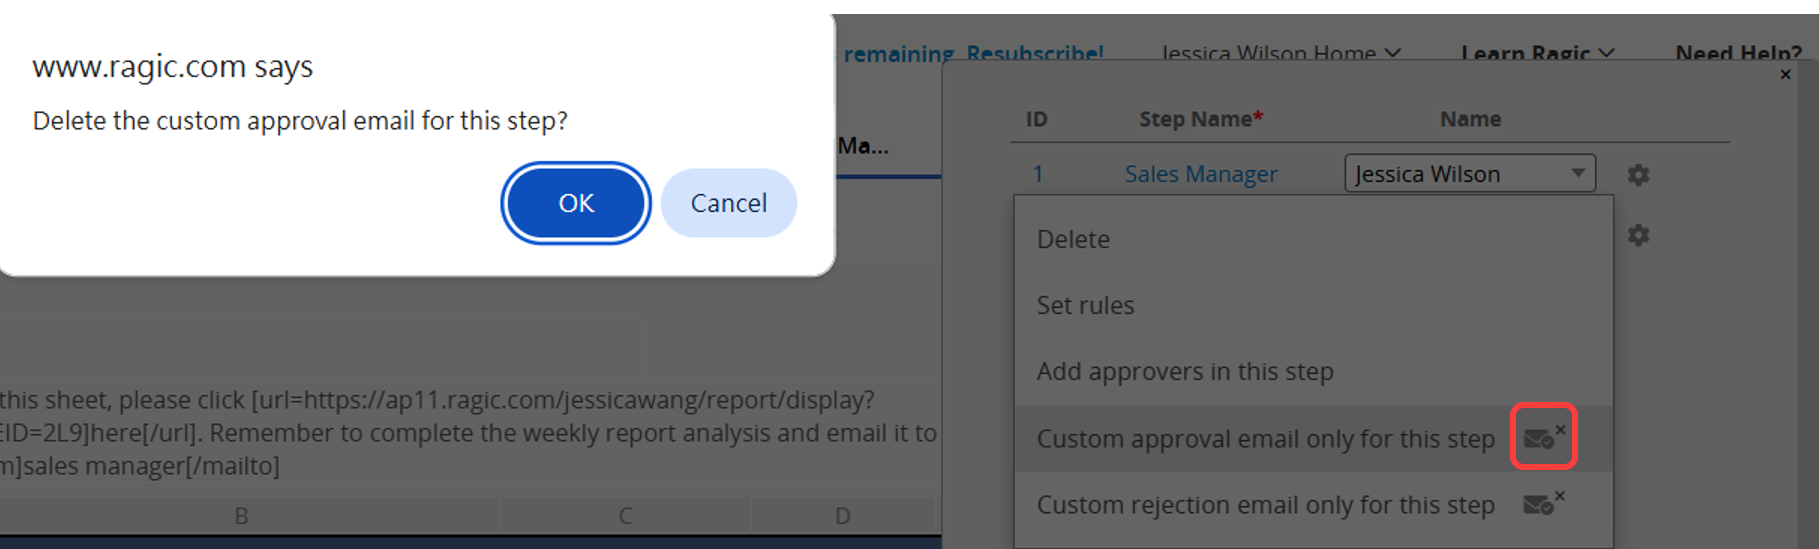
2. Step-Specific Approval Email: Click the "X" in the top right corner of the "E-mail" icon next to the step where a customized email has been applied to delete the setting. After deletion, if a General Approval Email is configured, the system will send the General Approval Email instead. Otherwise, the Default Approval Email will be sent for that step.
Here are the variables for the approval process:
{{CURRENT_APPROVAL_STEP_NAME}}: Displays the name of the current approval level.
{{PRIOR_APPROVAL_STEP_NAME}}: Displays the previous approval step name (shows "Approval Initiator" for the first step).
{{APPROVAL_EMAIL_BUTTON}}: Displays the approval action button.
{{APPROVAL_DETAIL_URL}}: Provides a hyperlink to the detailed content of the record.
{{MAIL_ENTRY_CONTENT}}: Displays the content of the record.
For other custom email template-supported variables, please refer here.
Once the approval process is completed, the system will send notifications to the relevant users based on the table below:
| Role in Approval Flow | Notification After Approval |
|---|---|
| Approval initiator | Yes |
| Any step approver | No |
| Users set to be notified when approval is completed | Yes (even if notifications are disabled) |
| Entry Managers | Yes |
The approval notification email content is the same, and only one notification will be sent, even if multiple conditions for sending a notification are met.
Notification Scenarios for Users with Multiple Roles:
1. If the user is both the approval initiator and set to be notified when approval is completed: The user will receive the notification. Both roles qualify for a notification, but only one will be sent.
2. If the user is both the approval initiator and the final approver: The user will receive the notification because it is sent to the approval initiator.
3. If the user is both set to be notified when approval is completed and the final approver: The user will not receive a notification, as the final approver is already aware of the approval result.
Note: Users set to be notified when approval is completed will still receive notifications, even if they've disabled Notification Settings. For other scenarios, users will not receive approval emails if notifications are turned off.
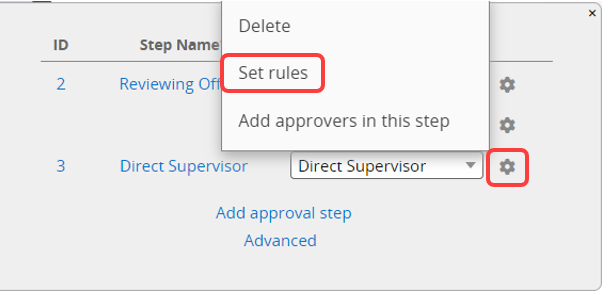
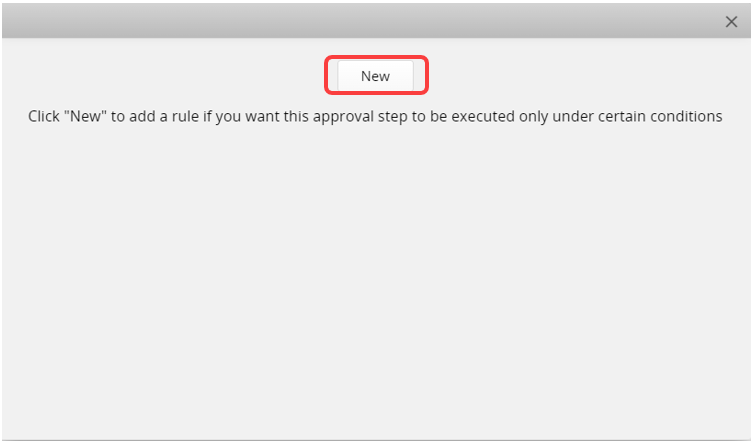
You can set rules to change the approval steps according to the values in the record. Click Set rules under the "Gear Icon" and click "New" to add a rule.
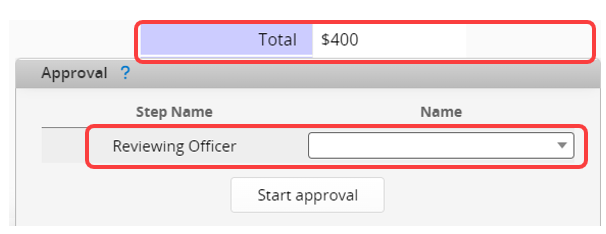
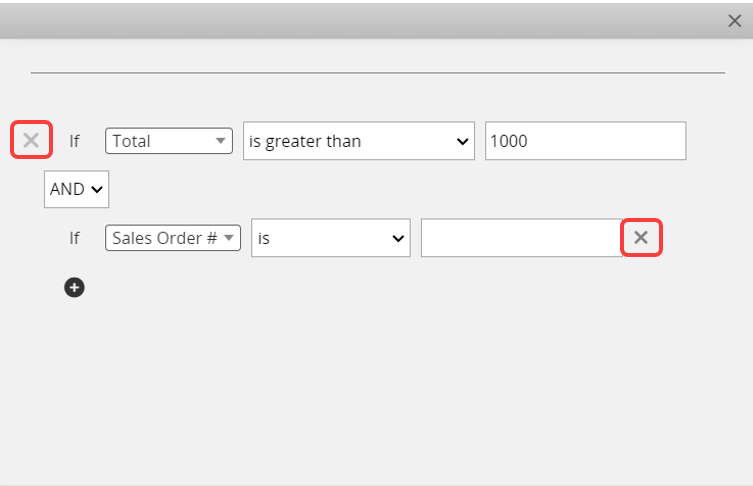
For example, you can create a rule stating that only orders totaling more than $1000 require sales manager approval. Additional rules can be added using the "+" sign.
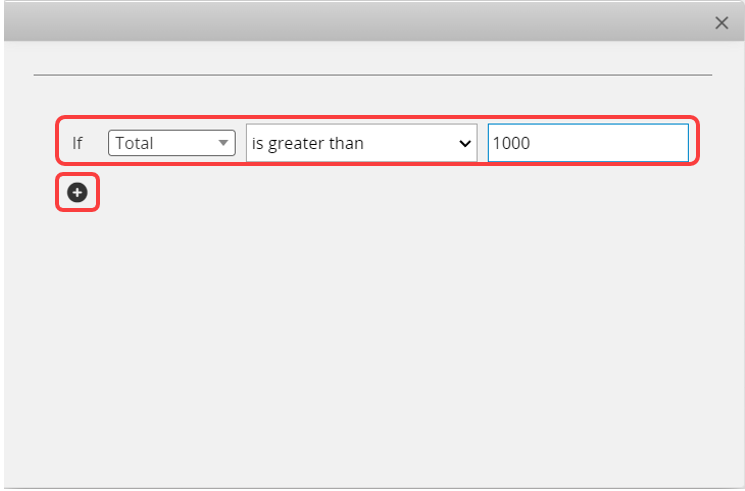
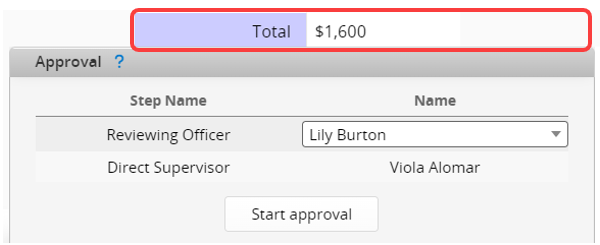
Otherwise, the approval process will skip that step.
Note: Please remember to remove the rules you don't need anymore by clicking "x". Otherwise, it will still be activated.
Note: You can also use Conditional Formatting to hide or show the "Start approval" button.
After adding an approval flow to your sheet, you can use the Listing Page Field Picker to add approval-related fields on the Listing Page.
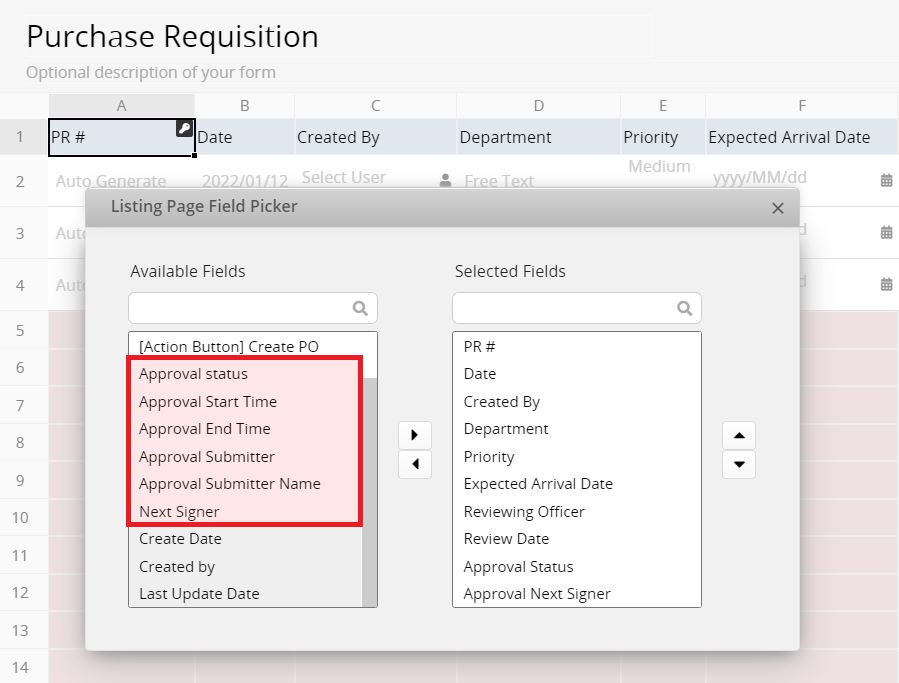
If you add these fields on the Listing Page, they will be automatically added on the bottom of the Form Page and set as Hidden by default.
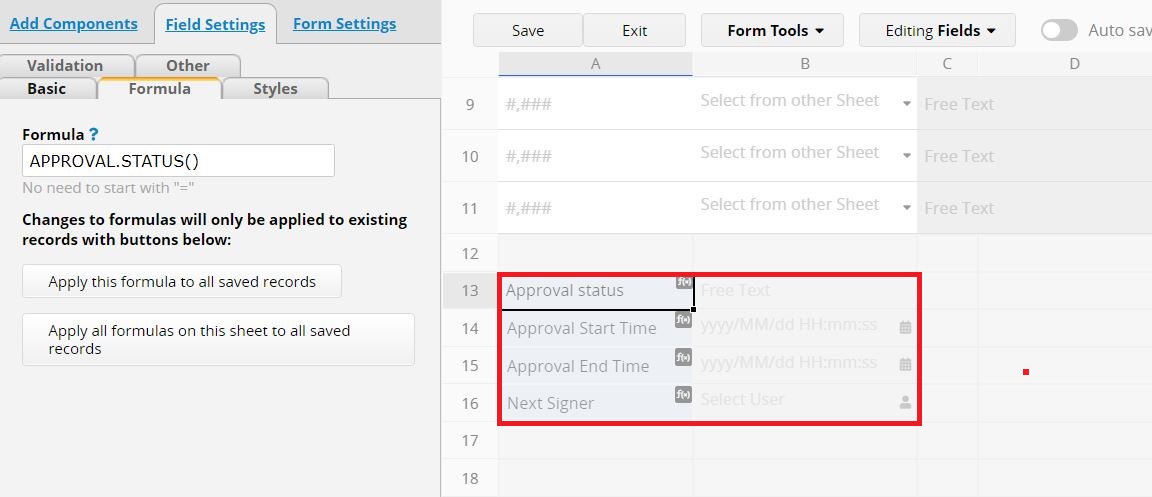
Alternatively, you may manually create fields and apply approval formulas to populate approval-related values. For example, if you would like to populate the status of the approval flow, you may create a free text field and apply the following formula.
APPROVAL.STATUS()
After saving, you can obtain the approval status of this record. You can use the Listing Page Field Picker to add new fields to the Listing Page.
Note:
The respective system values populated by applying the approval status formula are as follows:
N: New, indicating the approval process has not yet started or has been canceled.
P: Processing, indicating the approval process is ongoing and awaiting completion.
REJ: Rejected, indicating rejection by anyone approver.
F: Finish, indicating completion when all approvers agree.
If you want to convert these system values to text, such as displaying "Not started" when the returned value is "N", you can use the IF() formula.
Assuming the field applying the approval status formula is A1, you can create a new field in A2 and apply the following formula:
IF(A1.RAW="N","Not started",IF(A1.RAW="P","In process",IF(A1.RAW="F","Approved", IF(A1.RAW="REJ","Rejected",""))))
This allows you to quickly identify the approval status in the field.
Only users with sufficient access right can Start Approval of the record, including SYSAdmin, users with Admin access right to the sheet, or users who are the "entry managers" (the entry creator or users who have been assigned to the entry) with Bulletin User or Survey User access right to the sheet.
Please note that External Users cannot initiate the Approval Flow. For more information on using this feature, refer to this document.
Note: Once the approval process is initiated, the approver will automatically become the Entry Manager of the record. If Activate and Notify Deputy is enabled, the approver’s deputy will also be granted Entry Manager access to the record.
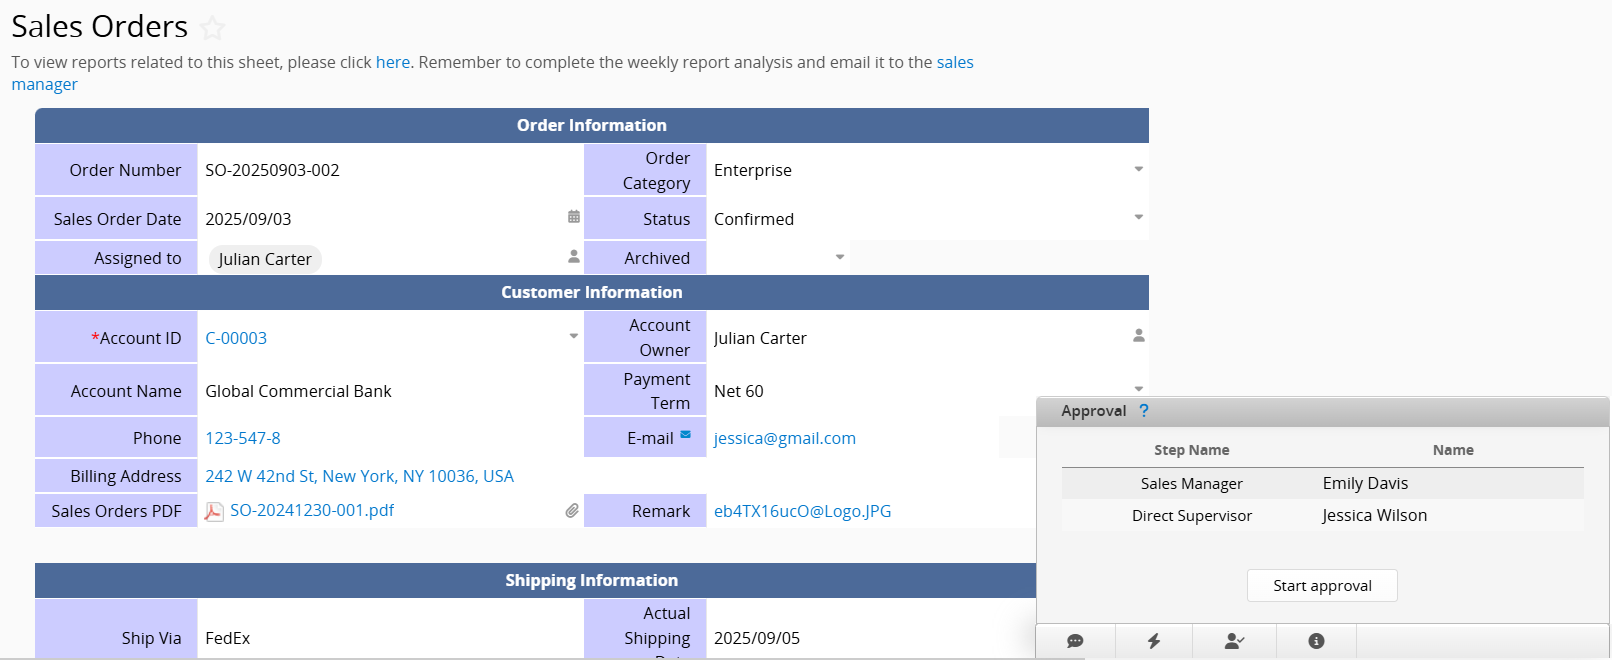
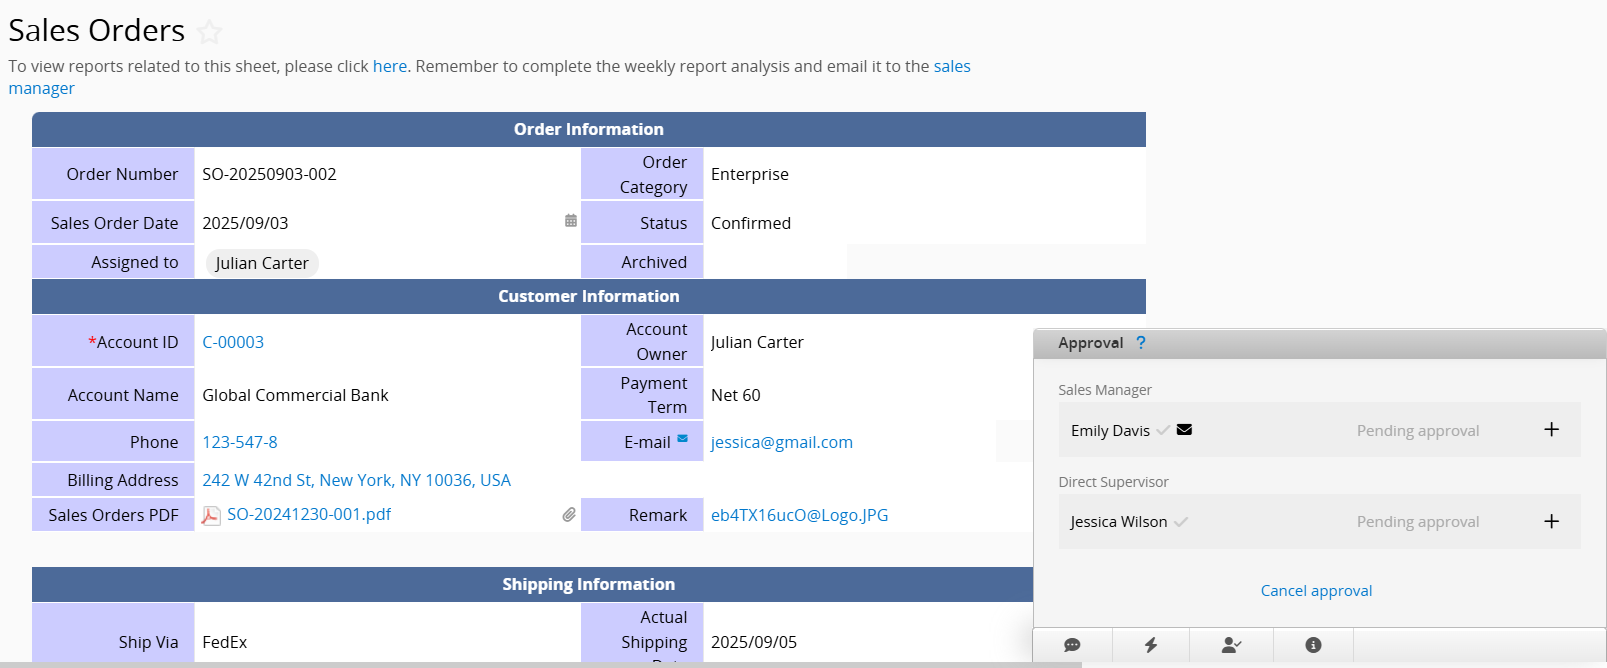
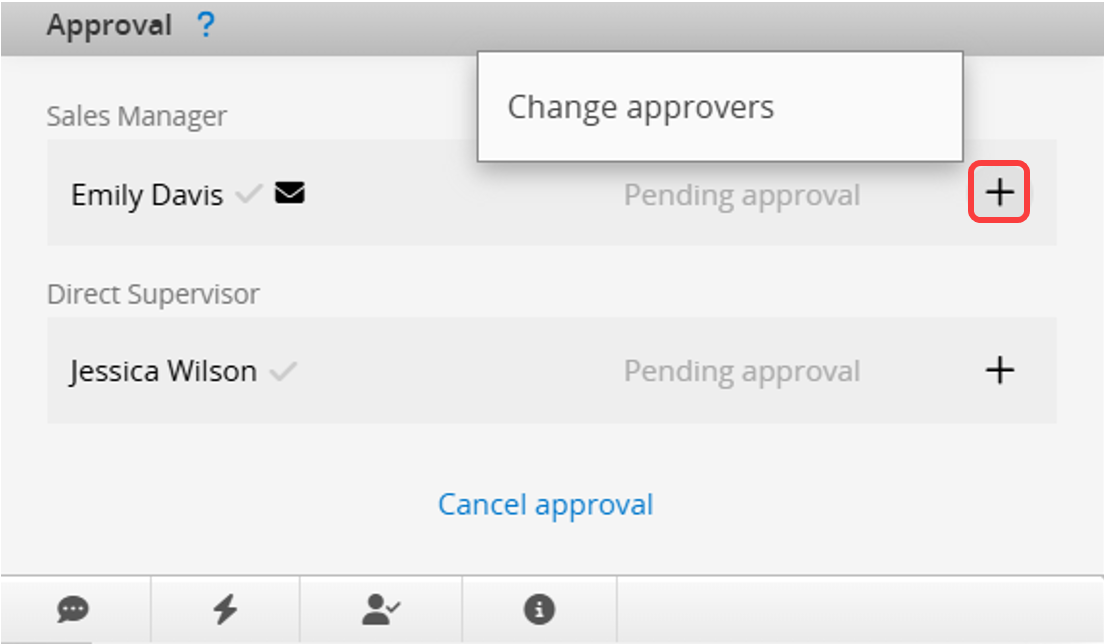
To change approvers, SYSAdmins can click the + icon and select Change approvers.
If a record is in the approval process and the pending approver is suspended, the system will continue sending automated notifications to that approver. This includes the following two scenarios:
1. If the approver is suspended during the approval process and Notify approvers again after ? days is enabled, automated notifications will continue to be sent.
2. If a user was assigned as an approver before being suspended and the approval process begins afterward, notifications will still be sent to the suspended approver. If Notify approvers again after ? days is enabled, automated notifications will also continue to be sent.
If you do not require approvals from suspended users, follow these steps:
1. Cancel the pending approvals for these records to prevent automated notifications from being sent to suspended users.
2. Remove suspended users from the approval process.
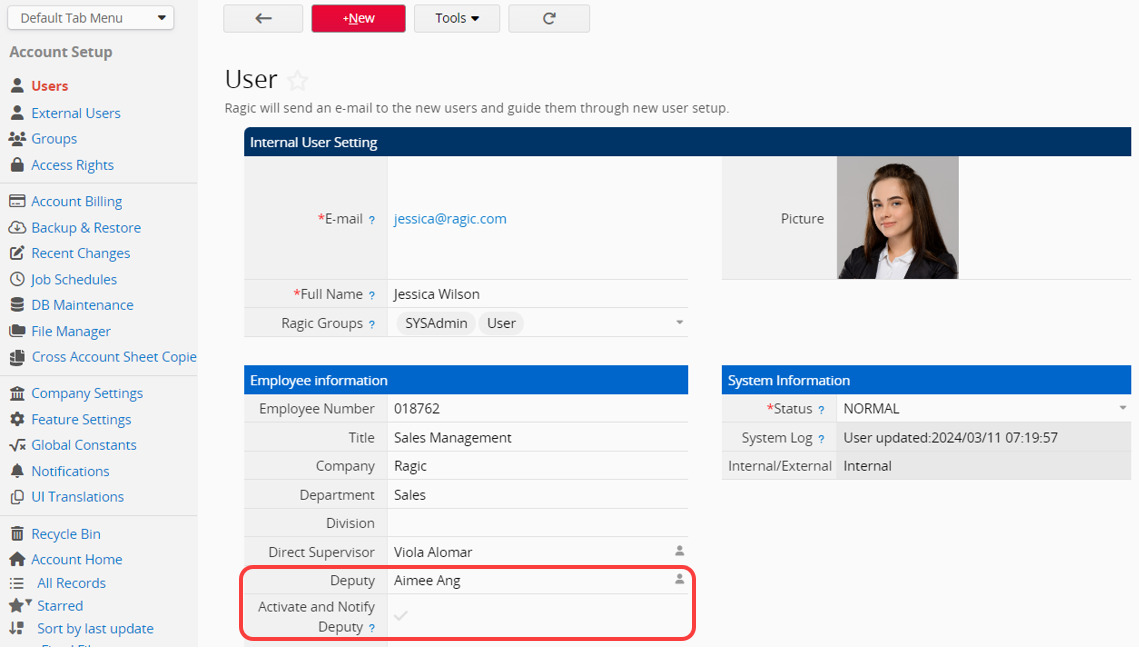
You can assign a deputy for users in the User Page allowing the deputy to approve or reject approval requests in the user's absence. For detailed information, please refer to this article.
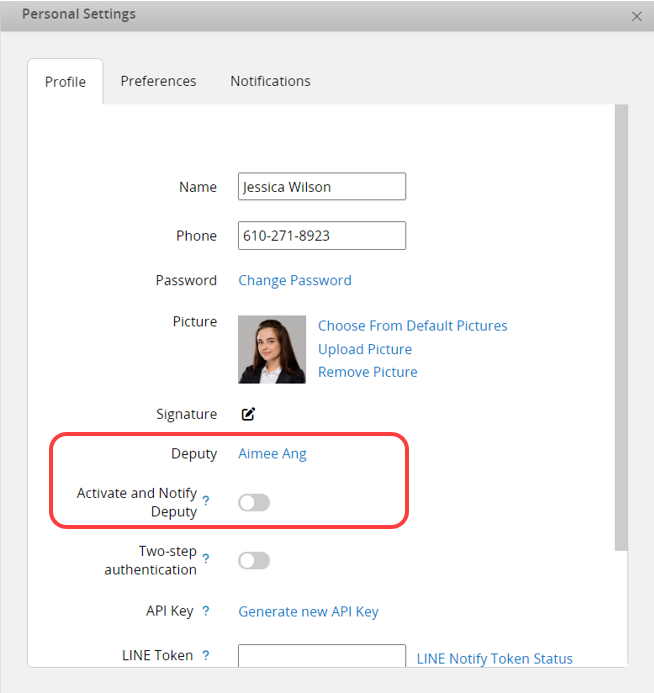
Remember to check the Activate and Notify Deputy options on the User Page to enable the Deputy Approval feature for that user and ensure the deputy receives approval notifications and emails.
Users can enable the Activate and Notify Deputy in their Personal Settings.
If you manually click to resend the notification email, both the approver and any deputies currently set to be notified will be added as Entry Managers.
Note:
If you can't see the Deputy field in your sheet, please contact Ragic support to update it.
For a clearer demonstration, you can refer to the following tutorial video.
 Thank you for your valuable feedback!